Adding social authentication in your django application from scratch
Introduction
In today's digital world, where users juggle numerous accounts across different platforms, creating a new login with email, username and password for every website can be tedious and inconvenient. This is where social login comes in, offering a user-friendly alternative for your Django authentication
By integrating social login functionality, you allow users to sign in seamlessly using their existing social media credentials like Google, Facebook, or Linkedin, eliminating the need for separate registration and password management.
This article serves as a beginner-friendly guide to implementing social login within your Django project. We'll explore the popular social login providers(Google, Facebook, Linkedin and Github), and walk you through a step-by-step process to set up this functionality in your application. By the end, you'll be equipped with the knowledge and skills to streamline your user experience and boost user engagement with seamless login options.
Prerequisites
- Python 3.x:
Django requires Python 3.x to function correctly. Ensure you have a compatible version installed on your system. -
Django Framework:
This guide assumes you have a Django project set up and running. If you're new to Django, numerous resources and tutorials are available online to get you started.
LET'S BEGIN!!!
CREATING THE DJANGO PROJECT
We start by creating a new django project that we'd be using for this tutorial
django-admin startproject django_social_auth
INSTALLING THE REQUIREMENTS
We need the requests package to send http requests and the django-dotenv package to be able to store our env variables.
pip install django requests python-dotenv
SETUP DJANGO-DOTENV
Go to settings.py and add this code to the top of the file
from dotenv import load_dotenv

BASE_DIR = Path(__file__).resolve().parent.parent

load_dotenv(BASE_DIR / '.env')
Create a file called .env in your project folder (The folder where manage.py is located)
CREATE DJANGO APP
After the installation, we can proceed to create the user app
python3 manage.py startapp user
Go to settings.py and add user to the installed apps
MAKEMIGRATIONS, MIGRATE AND RUNSERVER
The setup has been complete, now we run make migrations and migrate our database, then finally run our local server.
python3 manage.py makemigrations

python3 manage.py migrate

python3 manage.py runserver
go to your browser and paste the server localhost:8000
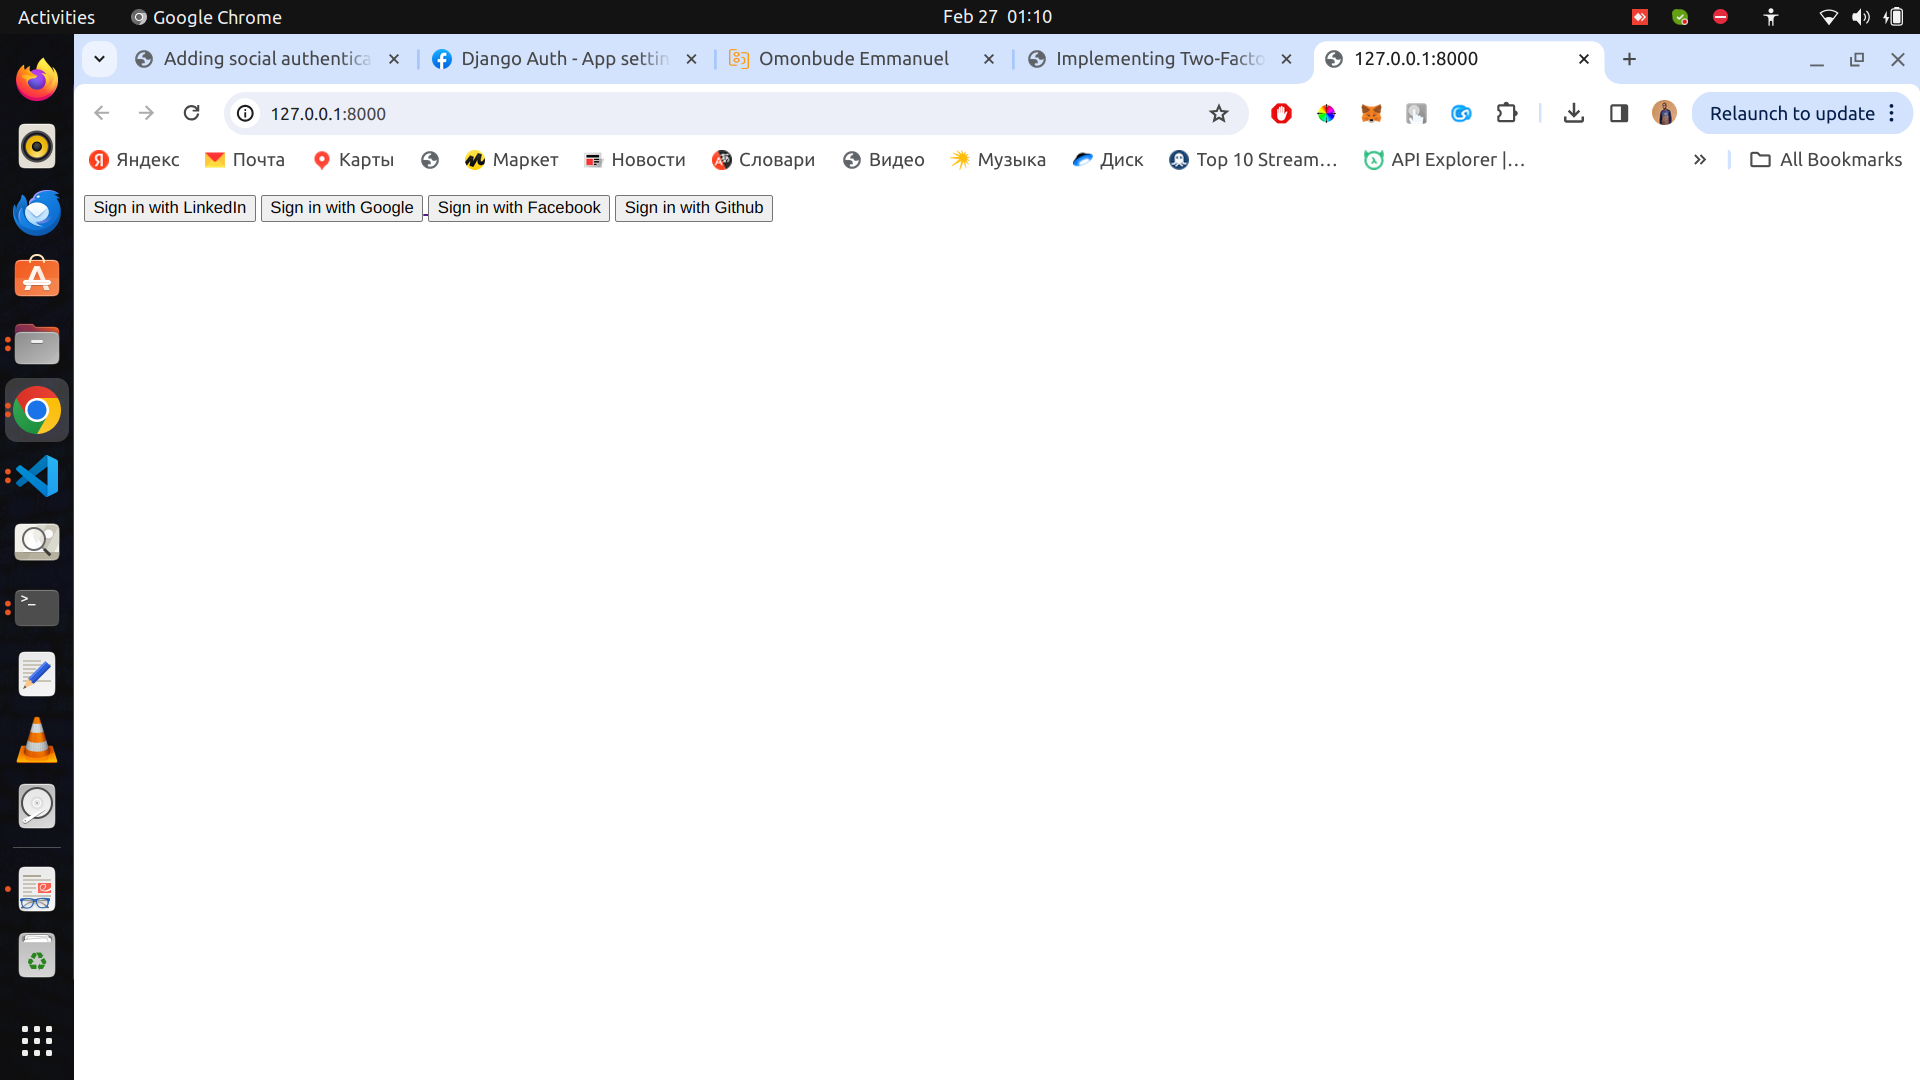
SIGNIN PAGE
We would create our signin page where the user will have to select which signin option they want to use to signin
views.py
paste the code below in the views.py
from django.shortcuts import redirect, render
from django.contrib.auth import logout, get_user_model
def signin_view(request):
return render(request, 'signin.html')
def logout_view(request):
logout(request)
return redirect('/')
Create a urls.py file in the user app and paste the following code
from django.urls import path
from . import views
app_name='userurl'
urlpatterns = [
path('', views.signin_view, name="signin"),
path('logout', views.logout_view, name="logout"),
]
Go to your project urls.py (the same folder with settings.py) and add the following code
from django.contrib import admin
from django.urls import include, path
urlpatterns = [
path('admin/', admin.site.urls),
path('', include('user.urls')),
]
Rendering the Templates
Create a folder called templates in your project folder (the folder where the manage.py is located) and create a file called signin.html
Add the code below to it
{% if request.user.is_authenticated %}
<p>Hello, {{ request.user.username }}</p>
<a href="{% url 'userurl:logout' %}"><button>Logout</button></a>
{% endif %}
<a href=""> <button>Sign in with LinkedIn</button></a>
<a href=""><button>Sign in with Google</button> </a>
<a href=""><button>Sign in with Facebook</button></a>
<a href=""><button>Sign in with Github</button></a>
Go to your settings.py, in your TEMPLATES block, add the following code, to be able to render the template
BASE_DIR / 'templates'
open localhost:8000, your signin page should be like the screenshot below
FACEBOOK AUTH
Integrating Facebook authentication in a Django web application allows users to log in using their Facebook accounts, simplifying the authentication process and improving user experience. By using Facebook's OAuth, developers can securely obtain user information and manage user sessions without handling sensitive user credentials.
To implement Facebook authentication in Django, you need to follow these general steps:
Step 1
Create a Facebook Developer Account: If you haven't already, create a developer account on Facebook's Developer Portal https://developers.facebook.com/. This will give you access to the necessary tools and settings for integrating Facebook authentication.
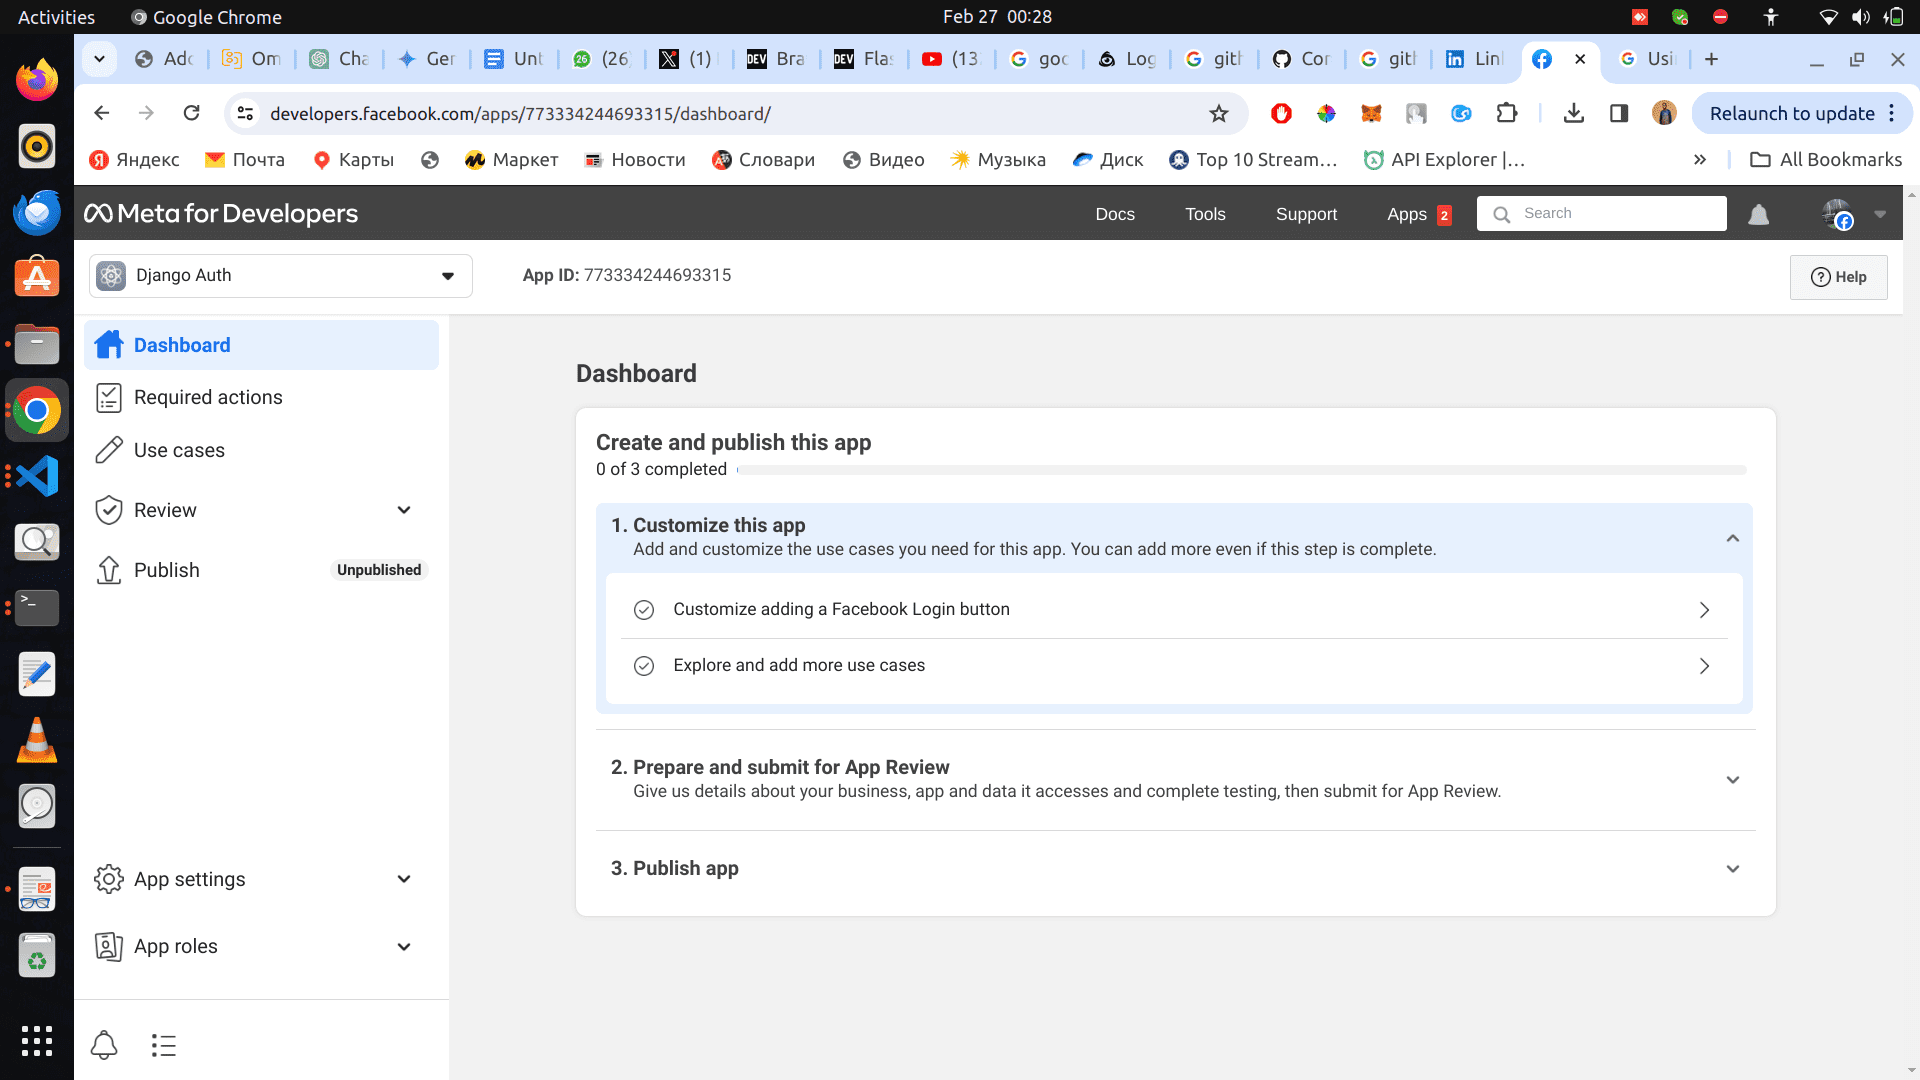
Create a New Facebook App: In the developer portal, create a new app and configure it for web use. You'll need to provide details about your app, such as its name, description, and category.
As at the time of this tutorial, your facebook app dashboard should look like the image below
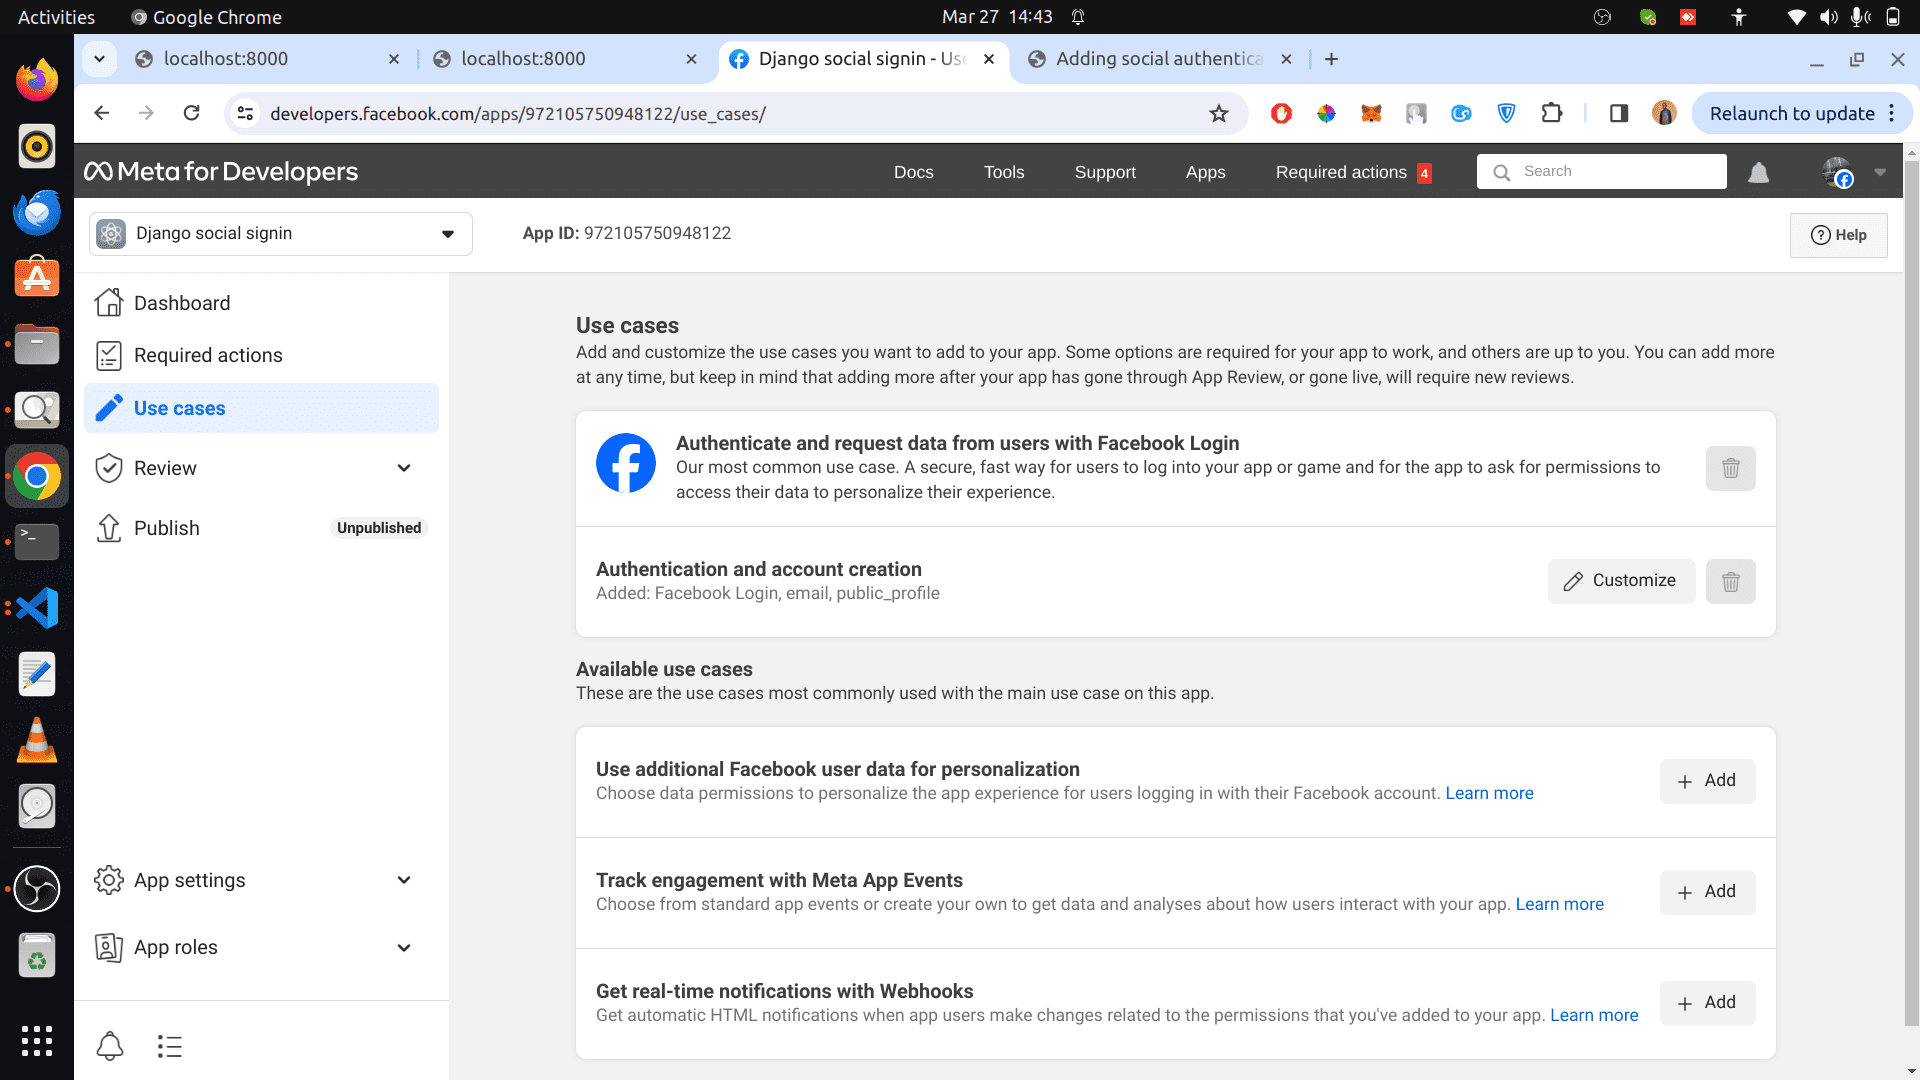
On the sidebar, click on Use Cases, click on customize button on the first card that shows.
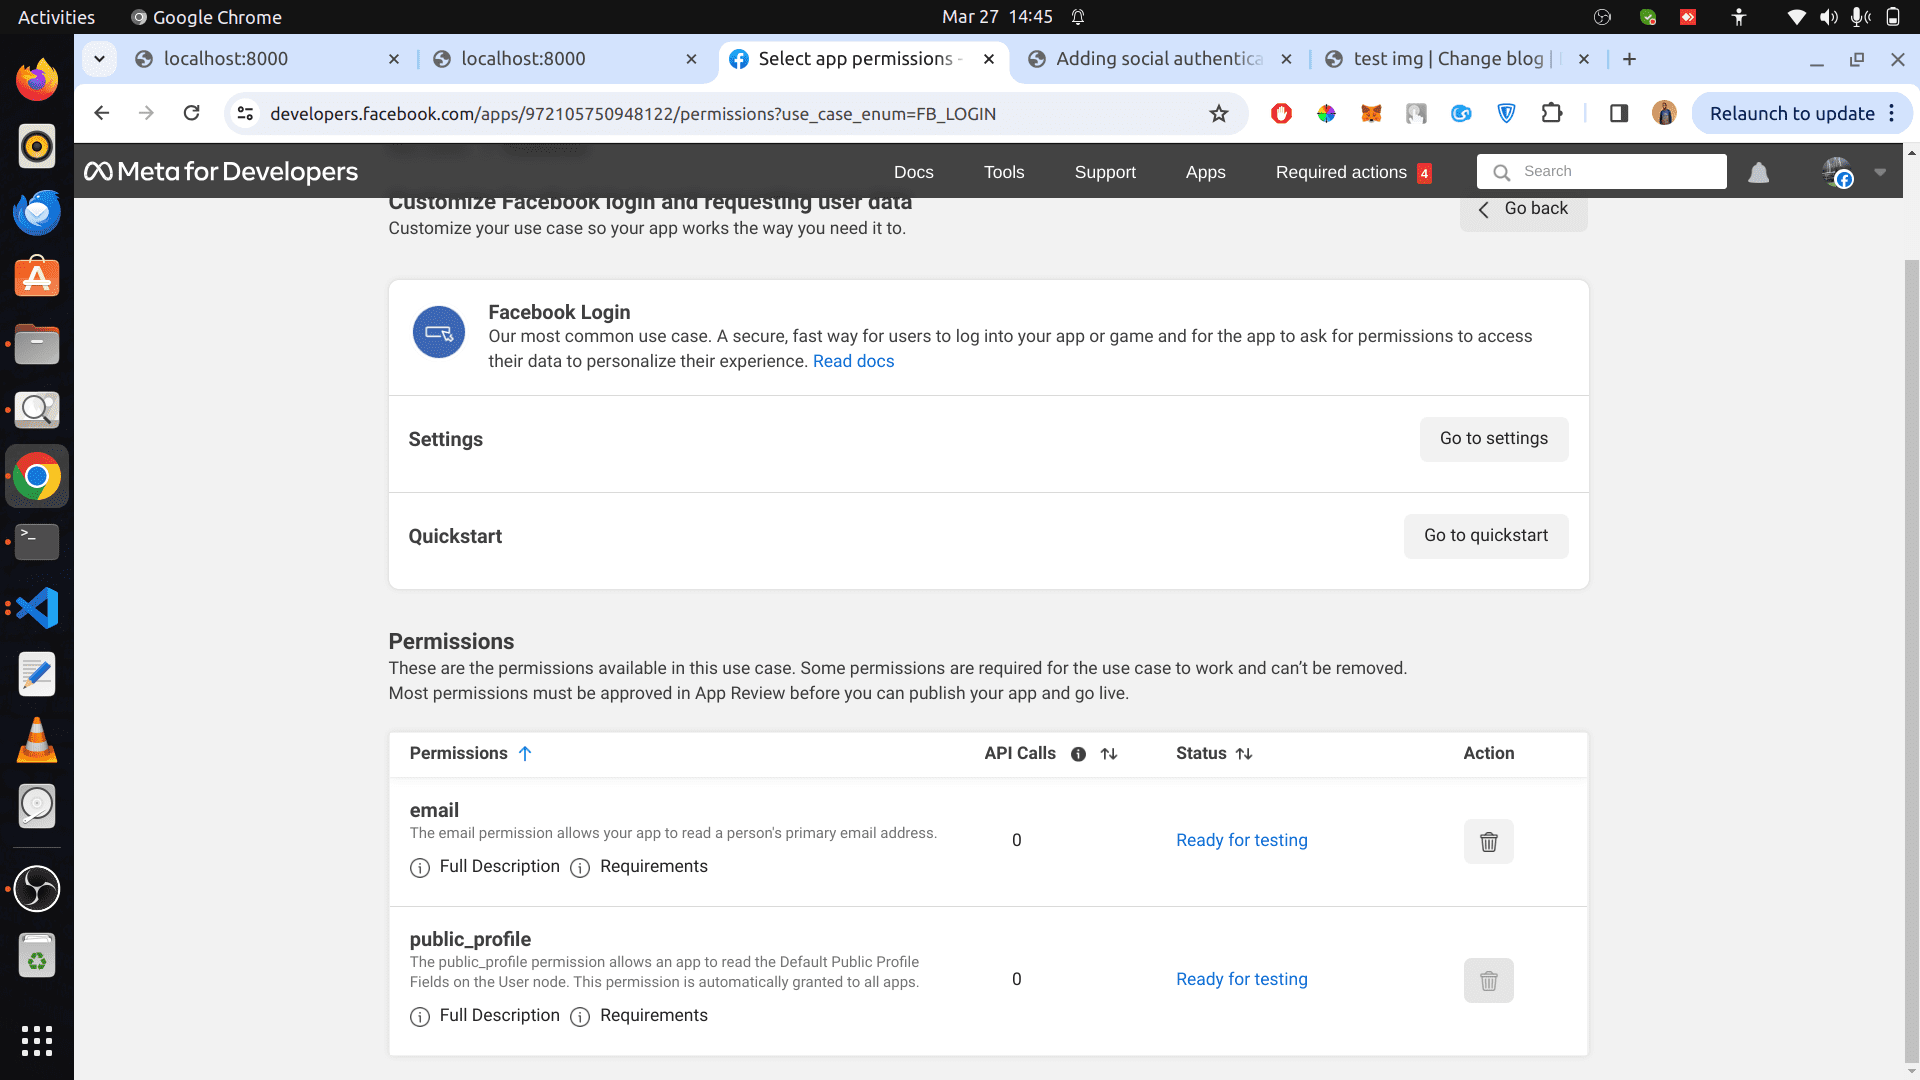
Finally click on Add button besides the email.
Click on App Settings on the side bar, and click on Basic settings, you should be taken to the basic settings page (screenshot below)
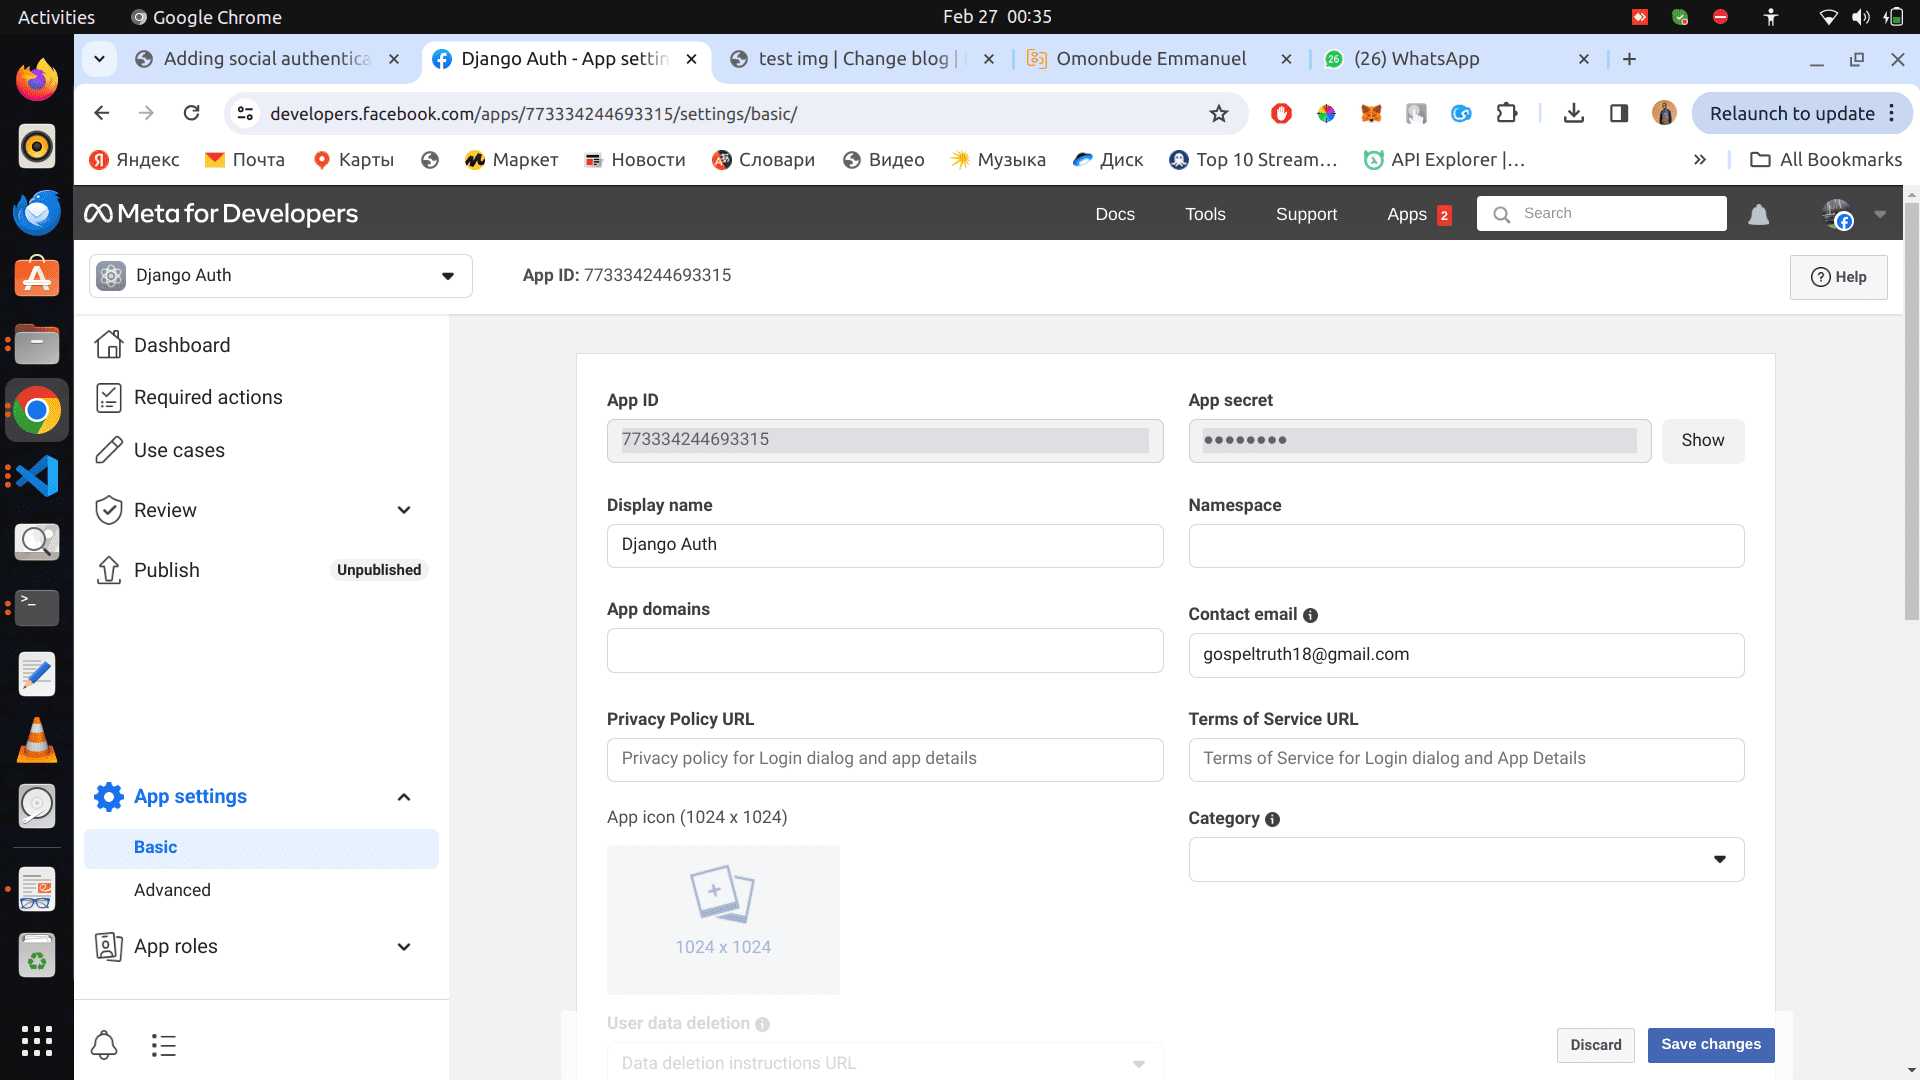
- Scroll down, click on Add platform button, select Website and click on the next button
- Under the website section, add http://localhost:8000 to the Site URL
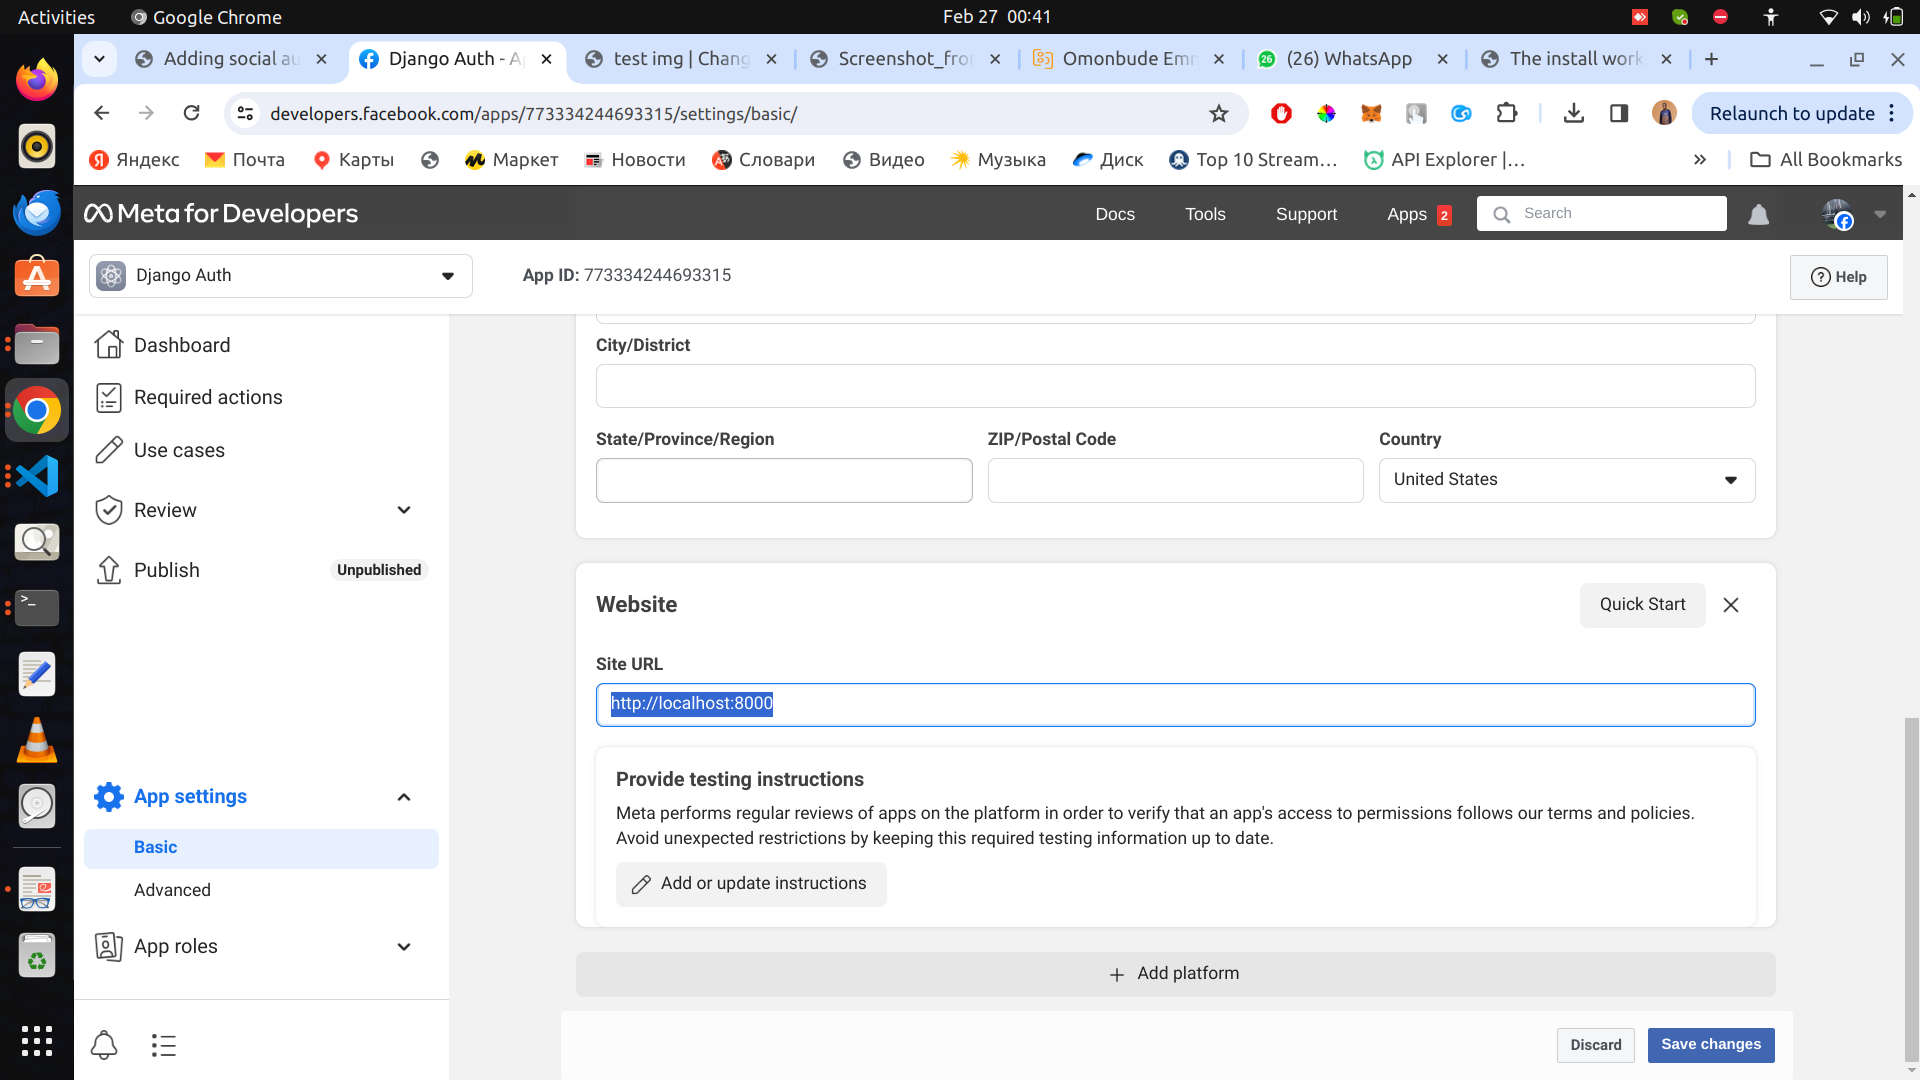
- Scroll up and add localhost to App Domains
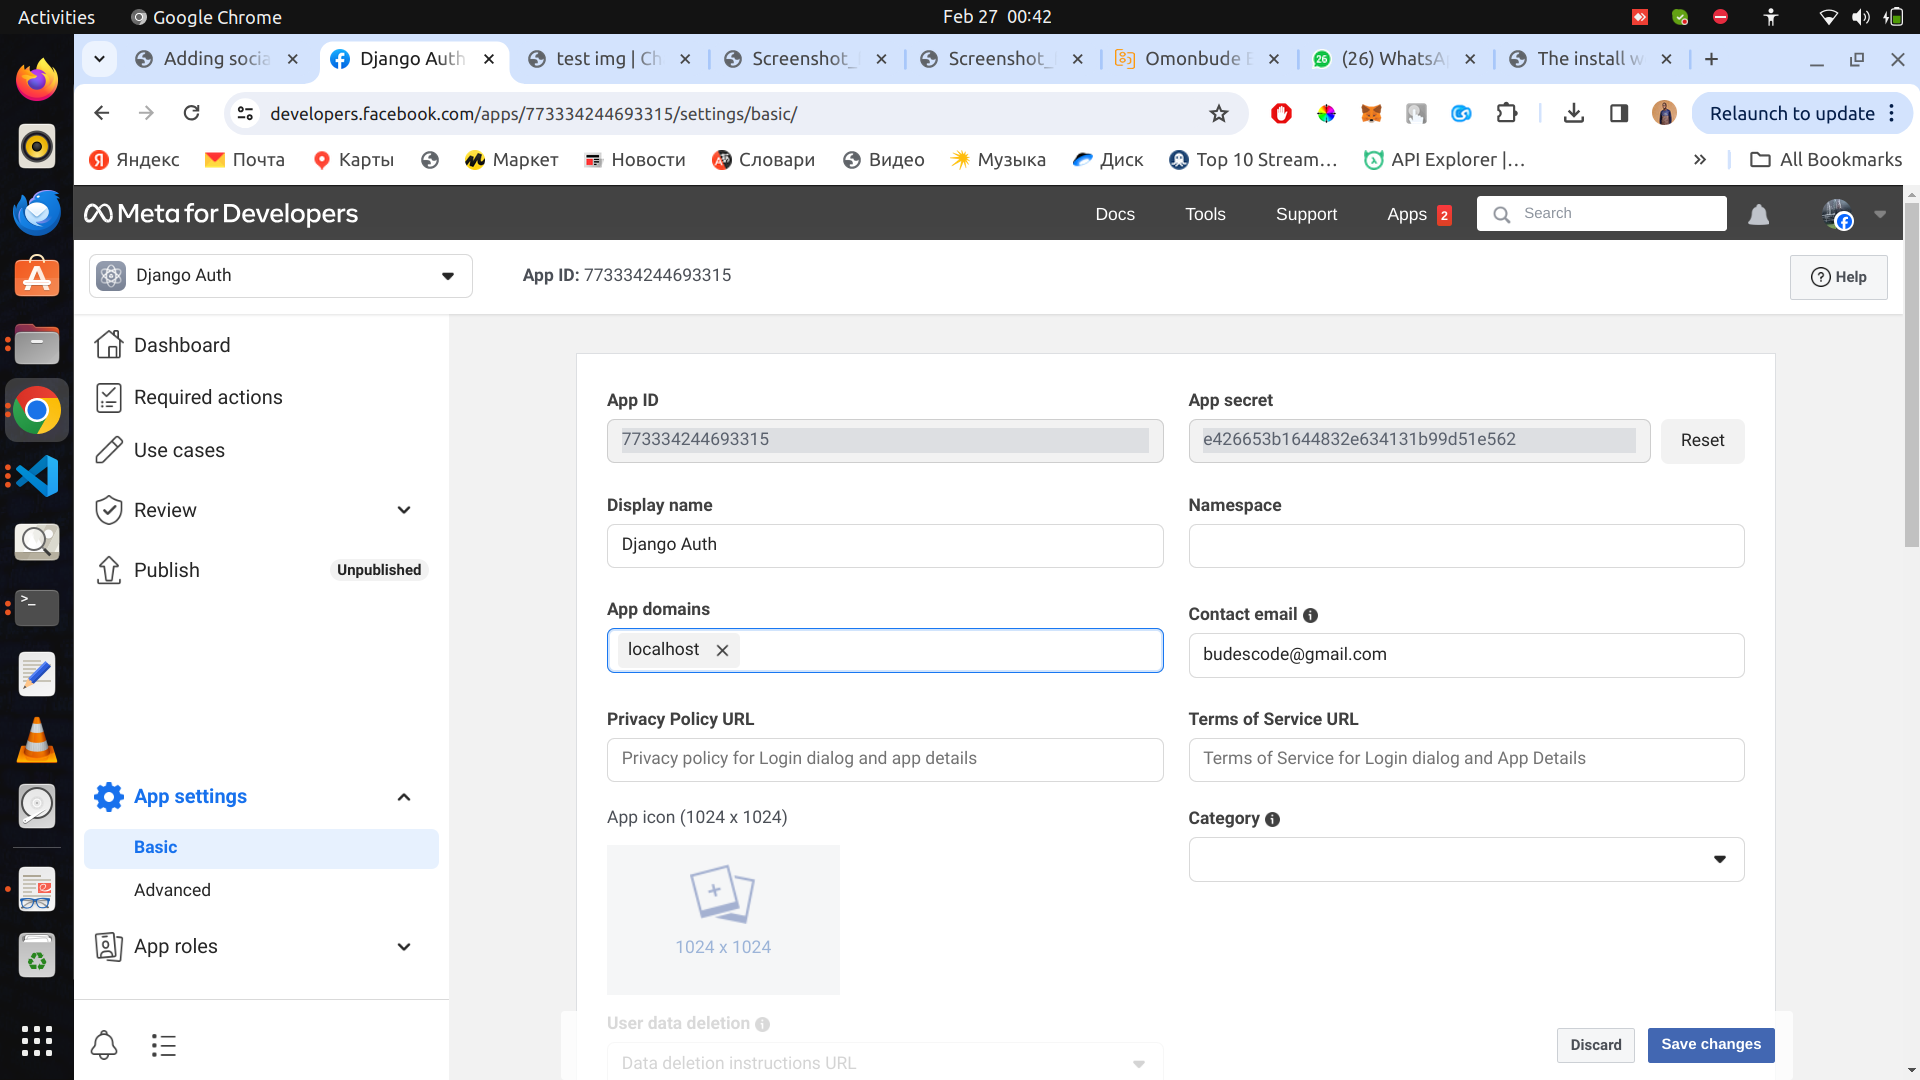
Copy the APP ID and APP secret, and paste them in the .env file
FACEBOOK_APP_ID=773334244693315

FACEBOOK_SECRET=e426653b1644832e634131b99d51e562
FACEBOOK_REDIRECT_URL=http://localhost:8000/facebook
We would need the FACEBOOK_REDIRECT_URL later on.
Add Facebook Details to views
def signin_view(request):
FACEBOOK_APP_ID = os.environ['FACEBOOK_APP_ID']
FACEBOOK_REDIRECT_URL = os.environ['FACEBOOK_REDIRECT_URL']
context = {"FACEBOOK_REDIRECT_URL":FACEBOOK_REDIRECT_URL, 'FACEBOOK_APP_ID':FACEBOOK_APP_ID}
return render(request, 'signin.html', context=context)
in your signin.html, paste this url on facebook href
https://www.facebook.com/v19.0/dialog/oauth?client_id={{ FACEBOOK_APP_ID}}&redirect_uri={{FACEBOOK_REDIRECT_URL}}&scope=email+public_profile
So, when the Sign in with Facebook button is clicked, it redirects us to facebook official website to signin, when the signin is successful, we should be redirected to http://localhost:8000/facebook with some query parameters attached.
Configure Facebook Redirect Url in our django app
We need to configure the redirect url, so that when the login is successful, we can extract the data and create account for our users or login.
Go to your views.py and paste the following code.
import os
from django.shortcuts import render, redirect
from django.contrib.auth import logout, login
import requests
from django.contrib.auth.models import User
def facebook_signin(request):
code = request.GET.get("code")
appId= os.environ['FACEBOOK_APP_ID']
appSecret = os.environ['FACEBOOK_SECRET']
redirect_uri = os.environ['FACEBOOK_REDIRECT_URL']
http_headers = {
'Content-Type': 'application/json',
}
url = f'https://graph.facebook.com/v19.0/oauth/access_token?client_id={appId}&redirect_uri={redirect_uri}&client_secret={appSecret}&code={code}'
resp = requests.get(url,headers=http_headers)
data = resp.json()
access_token = data['access_token']
#get user id with access token
url = f'https://graph.facebook.com/me?access_token={access_token}'
resp = requests.get(url,headers=http_headers)
data = resp.json()
id = data['id']
#get user details with id and access token
url = f'https://graph.facebook.com/{id}?fields=id,name,email,picture&access_token={access_token}'
resp = requests.get(url,headers=http_headers)
data = resp.json()
id = data['id']
name = data['name']
firstname, lastname = name.split(' ', 1)
email = data['email']
picture = data['picture']['data']['url']
user, created = User.objects.get_or_create(email=email, username=email, defaults={'first_name': firstname, 'last_name': lastname})
login(request, user)
return redirect("/")
Add the below code to your urls.py
path('facebook', views.facebook_signin, name="facebook_signin"),
Now run your server. And go to http://localhost:8000, click on the "Sign in with Facebook" button. It should redirect to facebook to login and then redirect to our redirect url, (http://localhost:8000/facebook). Our account should be created and logged in and finally redirected to the home page.
We should see our email there.
GOOGLE AUTH
We need to first get our keys for the oaith process.
Go to https://console.cloud.google.com/
Login with your gmail account. On the side bar, click on on
Step 1: Oauth Consent Screen
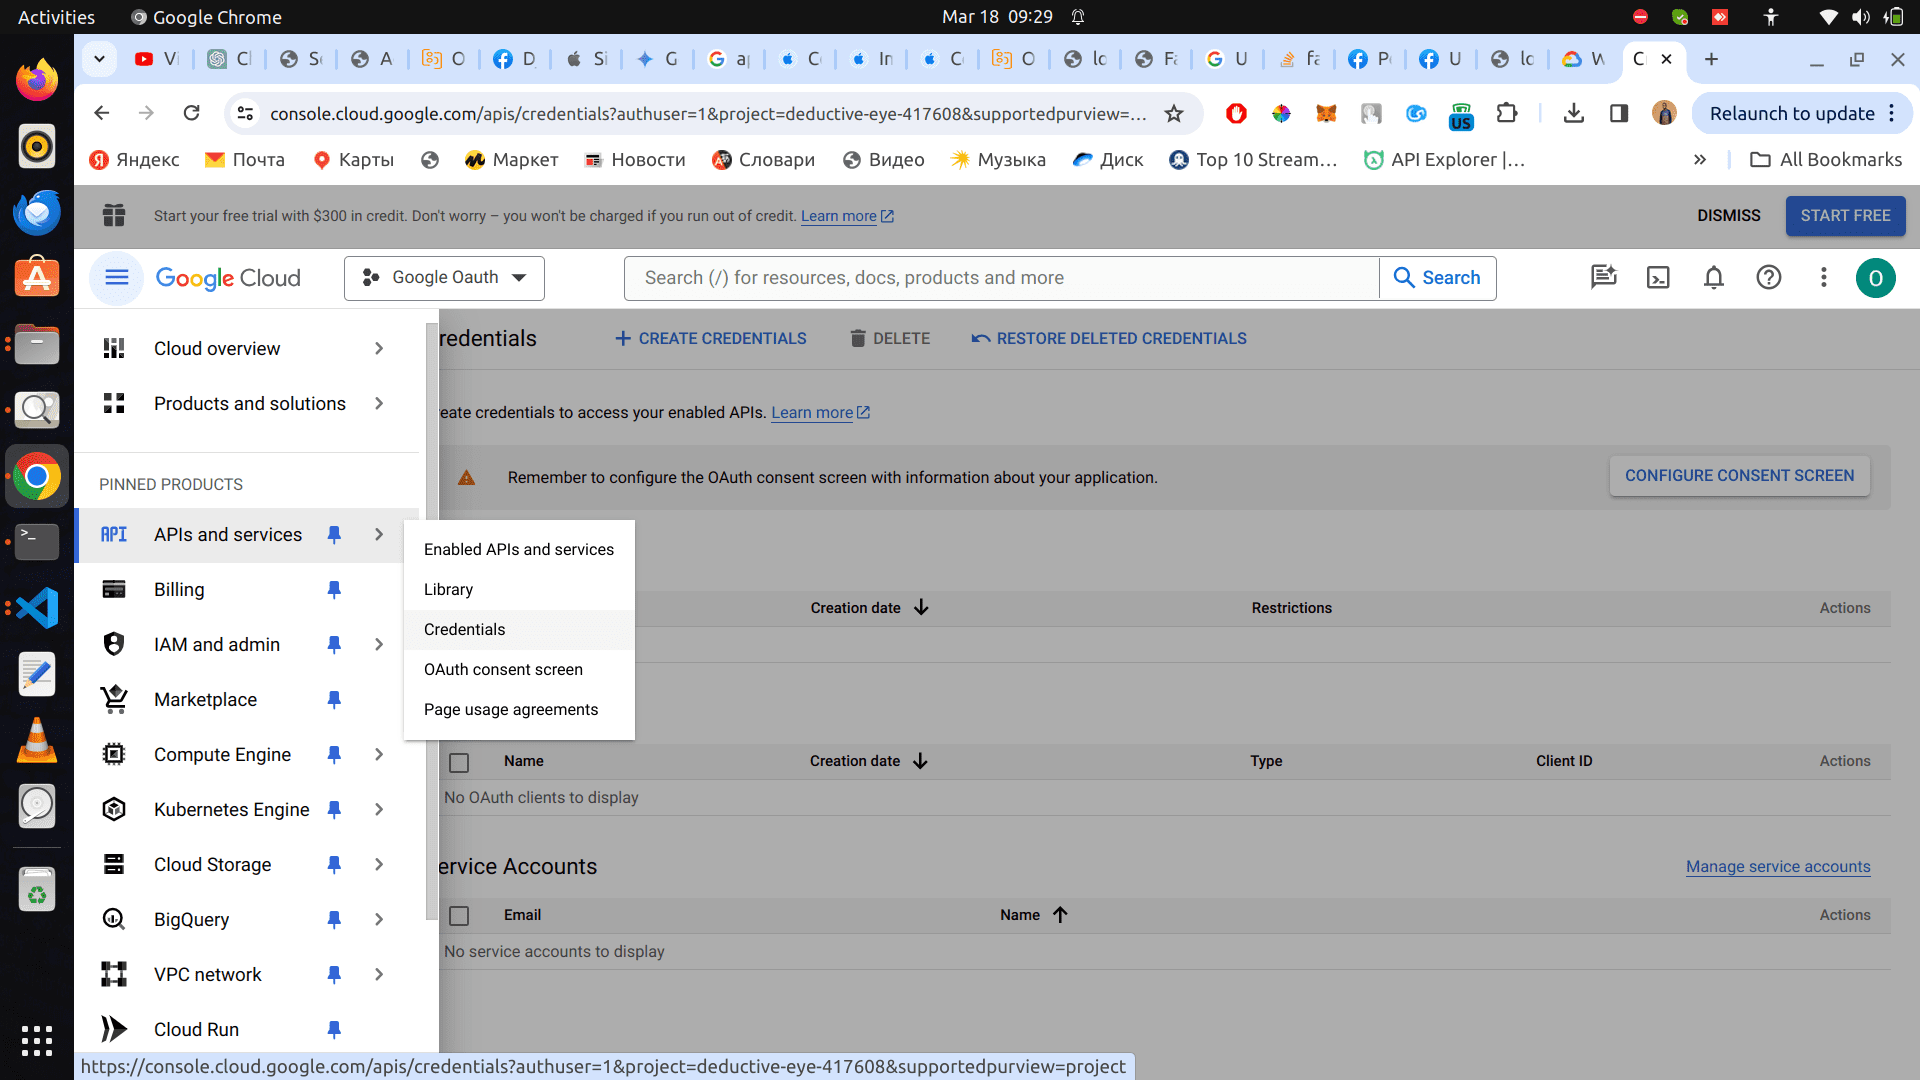
Api and services > Oauth consent screen.
Make sure you create a project there and fill the necessary credentials.
If you have done it already, move to the next step.
Step 2: Credentials
Once the oath consent screen has been created, click on Api and services > Credentials
Click on Create Credentials at the top, and click on Oauth Client ID on the popup.
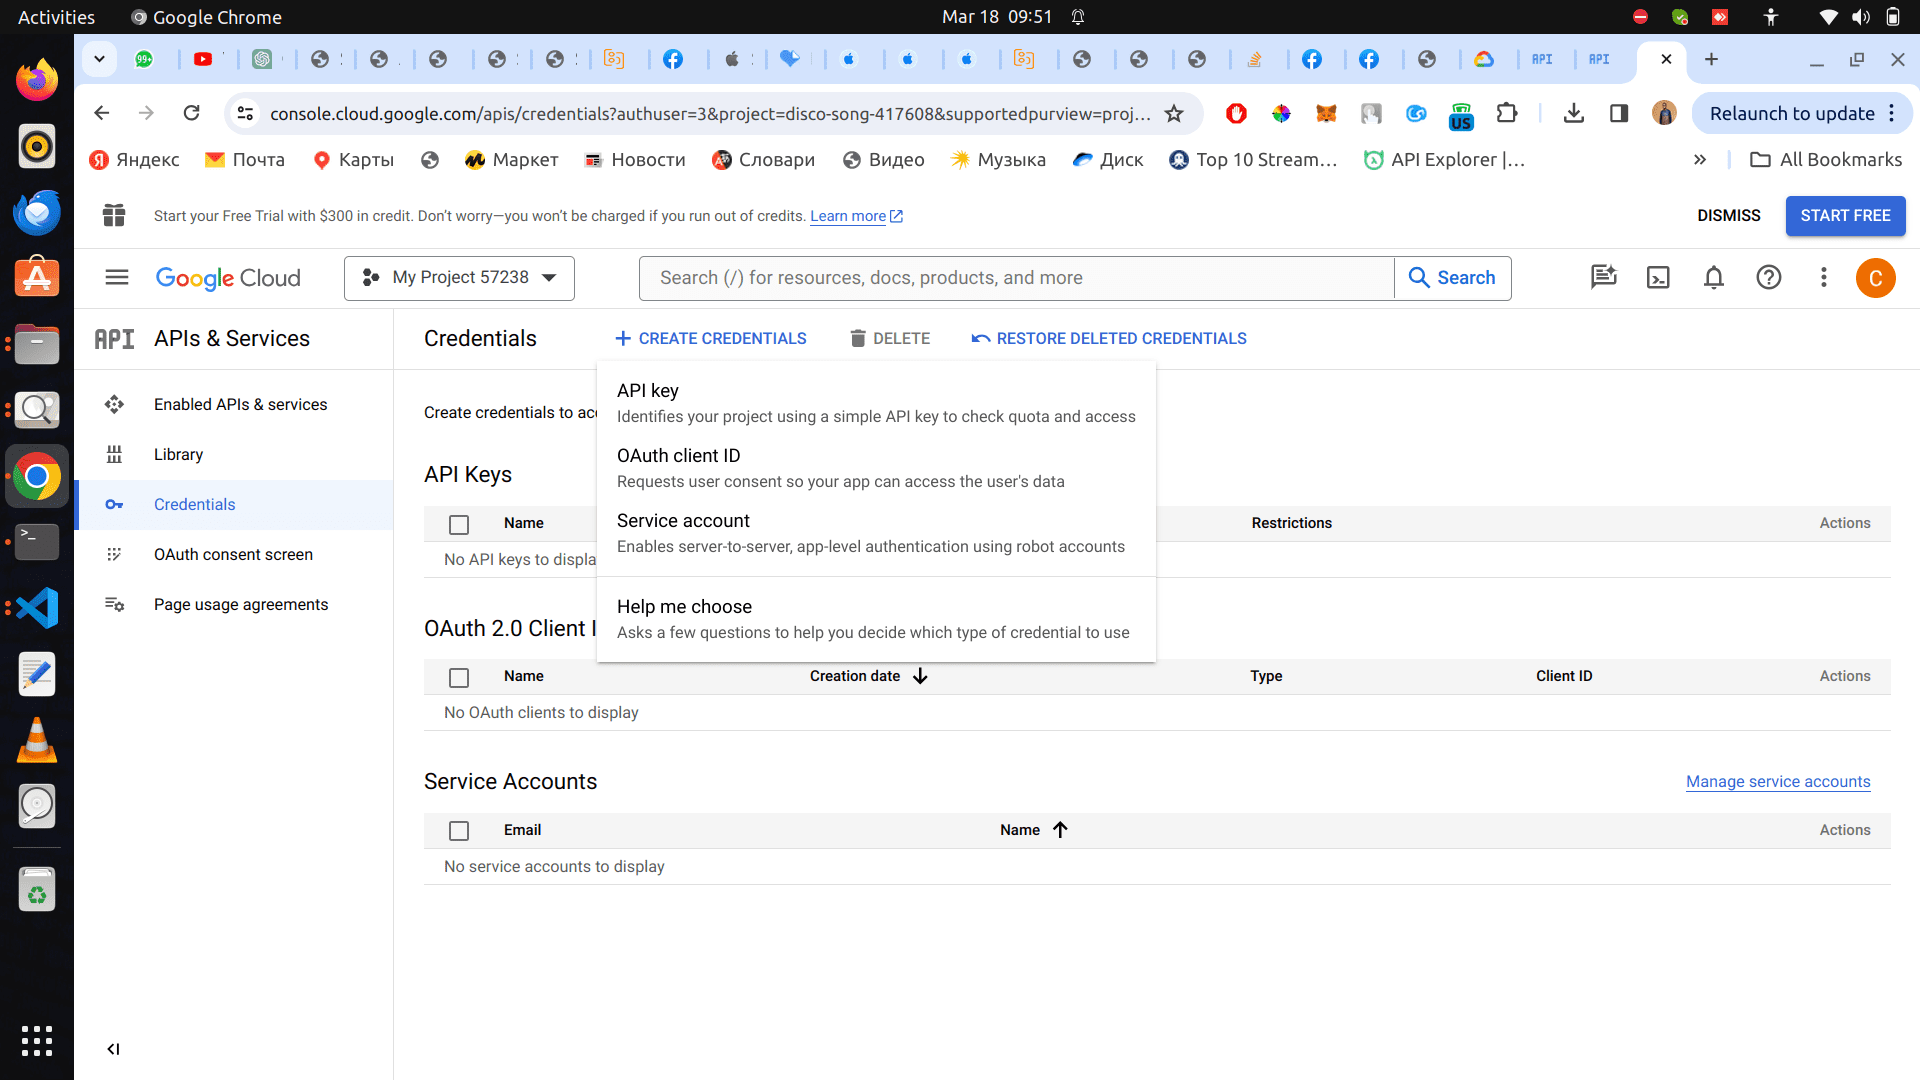
It redirects you to a page to create the OAuth client ID.
Under application type select Web Application
Enter your name as well.
Under Authorized JavaScript origins, enter localhost:8000
finally under Authorized redirect URIs, enter http://localhost:8000/google
Click on the Create Button
A screenshot will be attached below
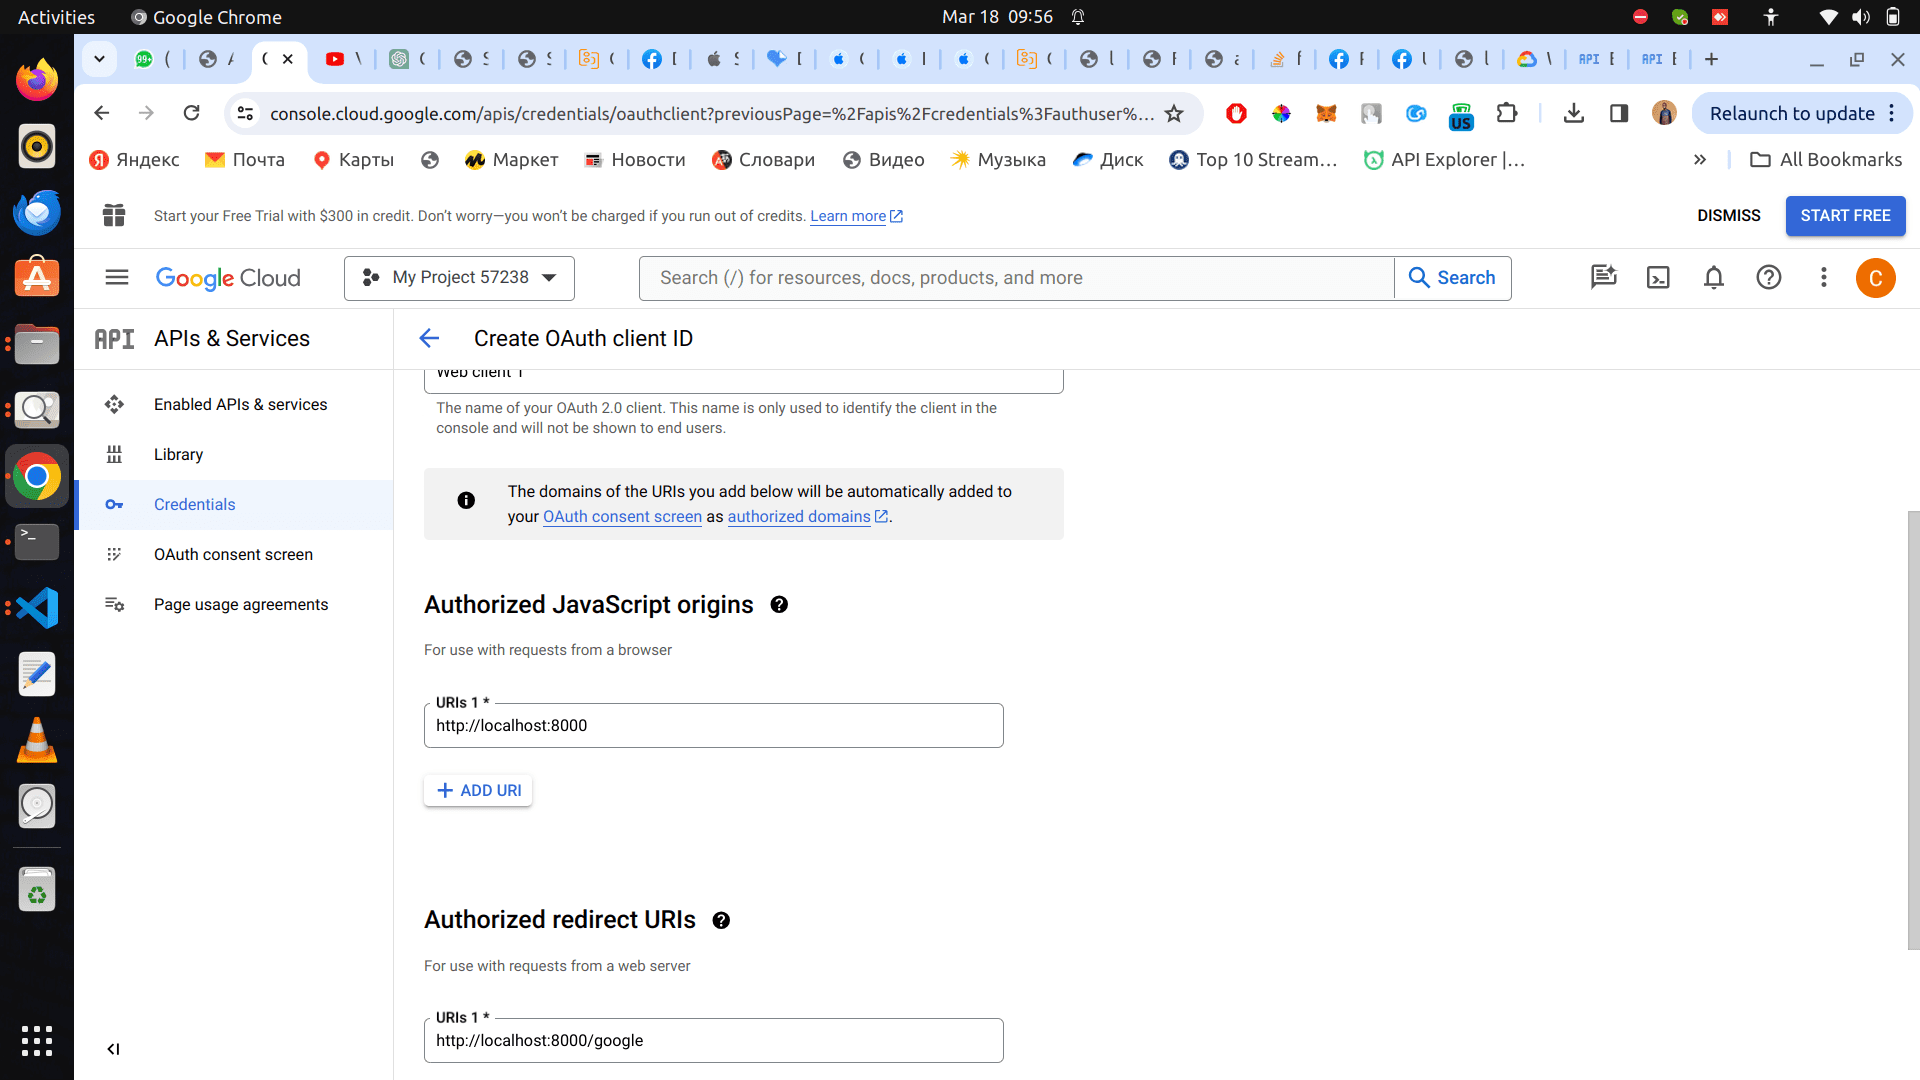
Copy your Client ID and Client Secret
Step 3: Env Variables
At this stage, we already have our client secret and client ID, we have to paste it in our env file. Open your env file and paste the details
GOOGLE_CLIENT_ID=1047551347240-rieh8u8nv6q05bnf481bdnbgffuenacc.apps.googleusercontent.com

GOOGLE_CLIENT_SECRET=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
Remember these details should be what you got when creating the credentials.
Step 4: Google People API:
We need to enable Google People API in google console to be able to access users data on their behalf.
On the side menu, click on
Api and services > Enabled APi & Services
Click on Enable APIS AND SERVICES
Search for Google people api. Clink on it and finally click on the Enable button to enable it.
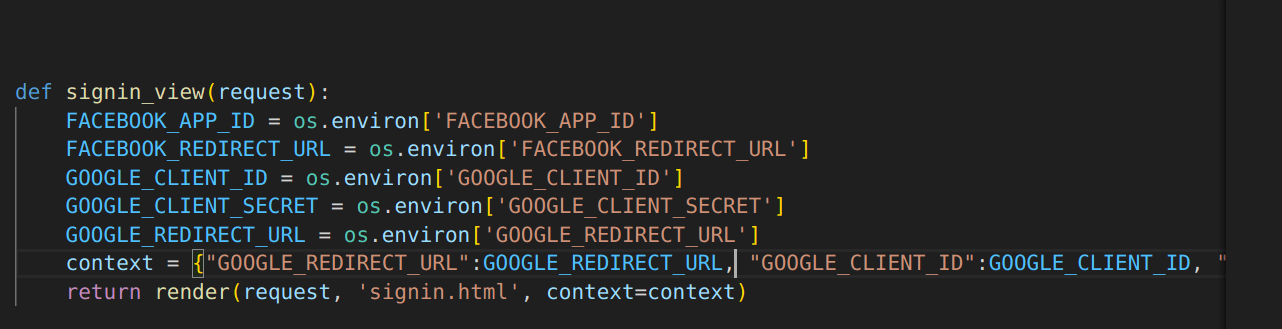
Step 5:views.py
In your signin_view, add the following code
GOOGLE_CLIENT_ID = os.environ['GOOGLE_CLIENT_ID']
GOOGLE_CLIENT_SECRET = os.environ['GOOGLE_CLIENT_SECRET']
GOOGLE_REDIRECT_URL=http://localhost:8000/google
Add it to your context as well because we would need it in our signin.html page.
Step 6: signin.html
Add the code below to the href in the Sign in with Google Button
https://accounts.google.com/o/oauth2/v2/auth?scope=openid+profile+email&include_granted_scopes=true&response_type=token&state=state_parameter_passthrough_value&redirect_uri={{ GOOGLE_REDIRECT_URL }}&client_id={{ GOOGLE_CLIENT_ID }}
Go to your browser and click on signin with google button, It should promt your email to signin with
Step 7 Redirect url in our app (view.py):
Note: Unlike facebook and other oath platforms, google redirect url details doesn't come as url parameters, so we have to create a
Paste the following code in your views.py
def google_signin(request):
access_token = request.GET.get("access_token")
if access_token:
headers1 = {
'Content-Type': 'application/json',
'Connection': 'Keep-Alive',
'Authorization': f'Bearer {access_token}',
}
url='https://people.googleapis.com/v1/people/me?personFields=emailAddresses,names,photos'
resp = requests.get(url,headers=headers1)
data = resp.json()
status_code = resp.status_code
if status_code <400:
familyName = data['names'][0]['familyName']
givenName = data['names'][0]['givenName']
email = data['emailAddresses'][0]['value']
photo = data['photos'][0]['url']
user, created = User.objects.get_or_create(email=email, username=email, defaults={'first_name': familyName, 'last_name': givenName})
login(request, user)
return redirect("/")
else:
return HttpResponse("error")
return render(request, 'google_signin.html')
Step 8: google_signin.html
Create google_signin.html file in your templates folder, and paste the following code
<!DOCTYPE html>
<html>
<head></head>
<body>
<script>
var fragment = window.location.hash.substr(1);
var fragmentParams = fragment.split('&');
var keyValue = fragmentParams[1].split('=');
var key = keyValue[0];
var value = keyValue[1];
console.log(value)
window.location.href = `/google?access_token=${value}`;
</script>
</body>
</html>
Step 9 Redirect url in our app (urls.py):
Paste the code below to your urls.py
path('google', views.google_signin, name="google_signin"),
Step 10: Login
Go to your http://localhost:8000/
Logout first before you attempt to login with google
LINKEDIN AUTH
Step 1: Get Client ID and Client Secret
We need to get our credentials for login authentication
Go to https://www.linkedin.com/developers/apps/ and create your app
Once created, you shoulld be redirected to products app, scroll down and click request access under Sign In with LinkedIn using OpenID Connect
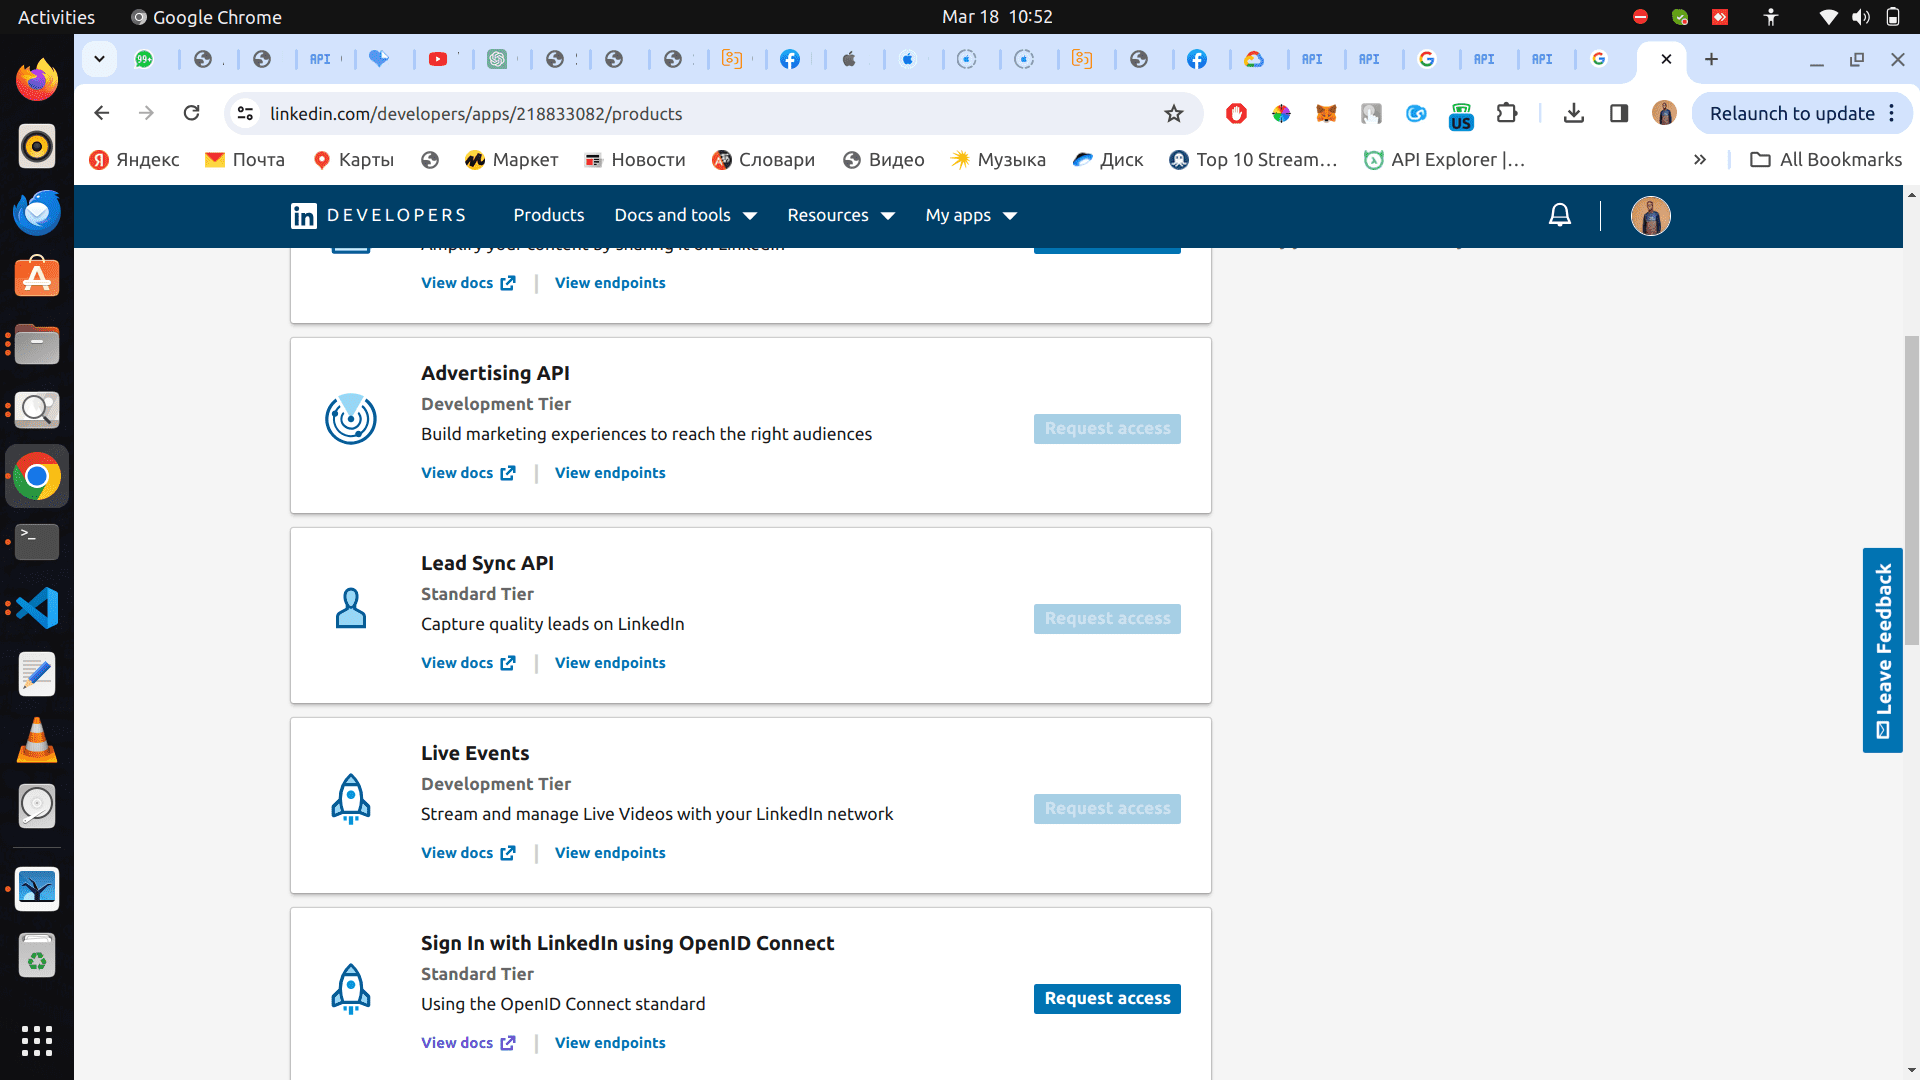
Click on auth tab, and copy the Client ID and Primary Client Secret
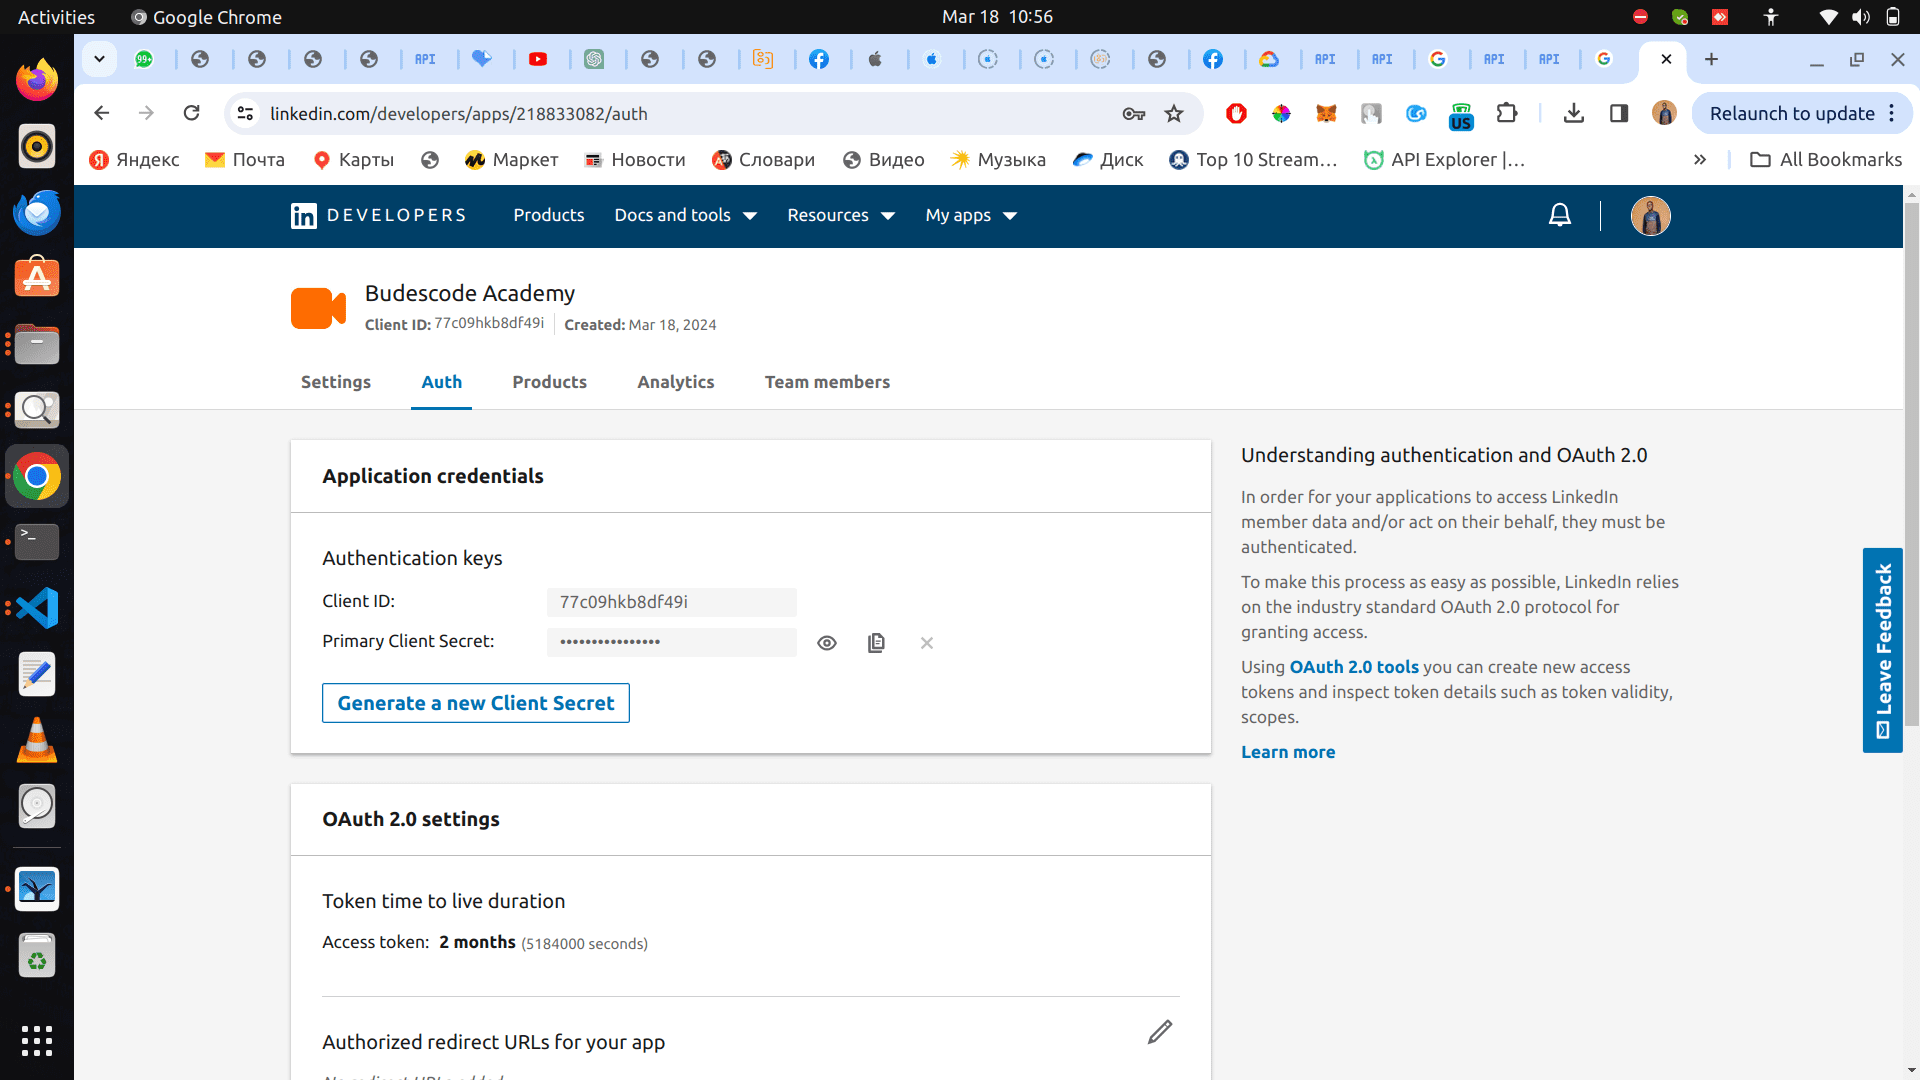
Step 2: Add Redirect url
Still under the auth tab, scroll down to OAuth 2.0 settings and add http://localhost:8000/linkedin to the Authorized redirect URLs.
Step 3: Env file
We have to save the credentials in our .env file
Paste the following code in your .env file
LINKEDIN_CLIENT_ID=77c09hkb8df49i
LINKEDIN_CLIENT_SECRET=trA2alnnjOT3DoA1
LINKEDIN_REDIRECT_URL=http://127.0.0.1:8000/linkedin
Step 4: Views.py
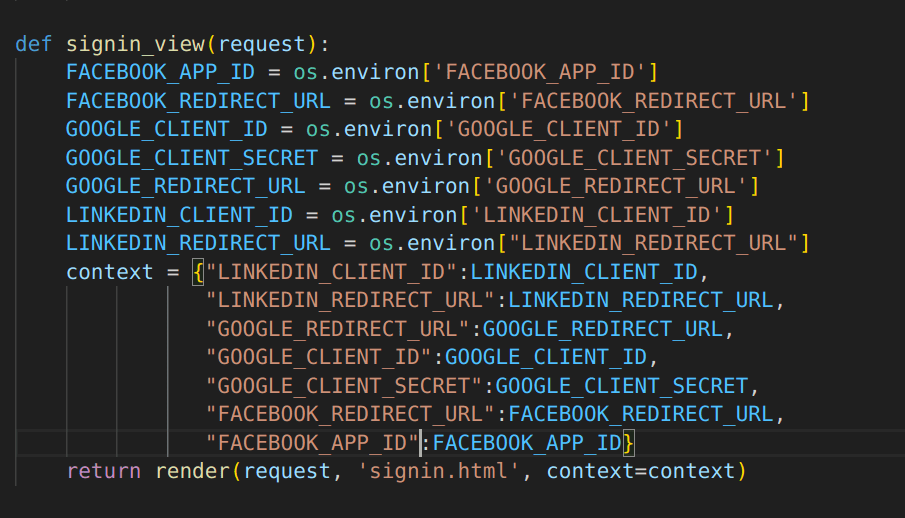
In your signin_view add the following codes to it
LINKEDIN_CLIENT_ID = os.environ['LINKEDIN_CLIENT_ID']
LINKEDIN_REDIRECT_URL = os.environ["LINKEDIN_REDIRECT_URL"]
Add the variables to your context as well.
Your code should be like the screenshot below
Step 5: signin.html
Add the code below to the href in Sign in with LinkedIn button
https://www.linkedin.com/oauth/v2/authorization?response_type=code&client_id={{ LINKEDIN_CLIENT_ID }}&redirect_uri={{ LINKEDIN_REDIRECT_URL }}&scope=openid+profile+email
Step 6: Creating redirect url (views.py)
Paste the code below to your vies.py
def linked_in_oauth(request):
code = request.GET.get("code")
headers1 = {
'Content-Type': 'application/x-www-form-urlencoded',
'Connection': 'Keep-Alive'
}
LINKEDIN_CLIENT_ID=os.environ["LINKEDIN_CLIENT_ID"]
LINKEDIN_CLIENT_SECRET=os.environ["LINKEDIN_CLIENT_SECRET"]
LINKEDIN_REDIRECT_URL=os.environ["LINKEDIN_REDIRECT_URL"]
#############################get access token #########################
body = {'grant_type':'authorization_code', 'client_secret':LINKEDIN_CLIENT_SECRET, 'client_id':LINKEDIN_CLIENT_ID, 'code':code, 'redirect_uri':LINKEDIN_REDIRECT_URL}
resp = requests.post("https://www.linkedin.com/oauth/v2/accessToken", data=body, headers=headers1)
data = resp.json()
status_code = resp.status_code
if status_code <400:
#############################get user info#########################
token = data['access_token']
headers1 = {
'Content-Type': 'application/x-www-form-urlencoded',
'Connection': 'Keep-Alive',
'Authorization': f'Bearer {token}',
}
resp = requests.get("https://api.linkedin.com/v2/userinfo",headers=headers1)
data = resp.json()
status_code = resp.status_code
if status_code <400:
name = data['name']
given_name = data['given_name']
family_name = data['family_name']
email = data['email']
picture = data['picture']
user, created = User.objects.get_or_create(email=email, username=email, defaults={'first_name': family_name, 'last_name': given_name})
login(request, user)
return redirect("/")
else:
return HttpResponse("error")
else:
return HttpResponse("error")
Step 7: Creating redirect url (urls.py)
Paste the code below to your urls.py
path('linkedin', views.linked_in_oauth, name="linkedin_signin"),
Step 8: Testing
Go to http://localhost:8000/
Click on signin with linkedin and proceed
GITHUB AUTH
Step1: Getting Credentials
Go to https://github.com/settings/developers and click on Oauth Apps
Create a new Oauth App
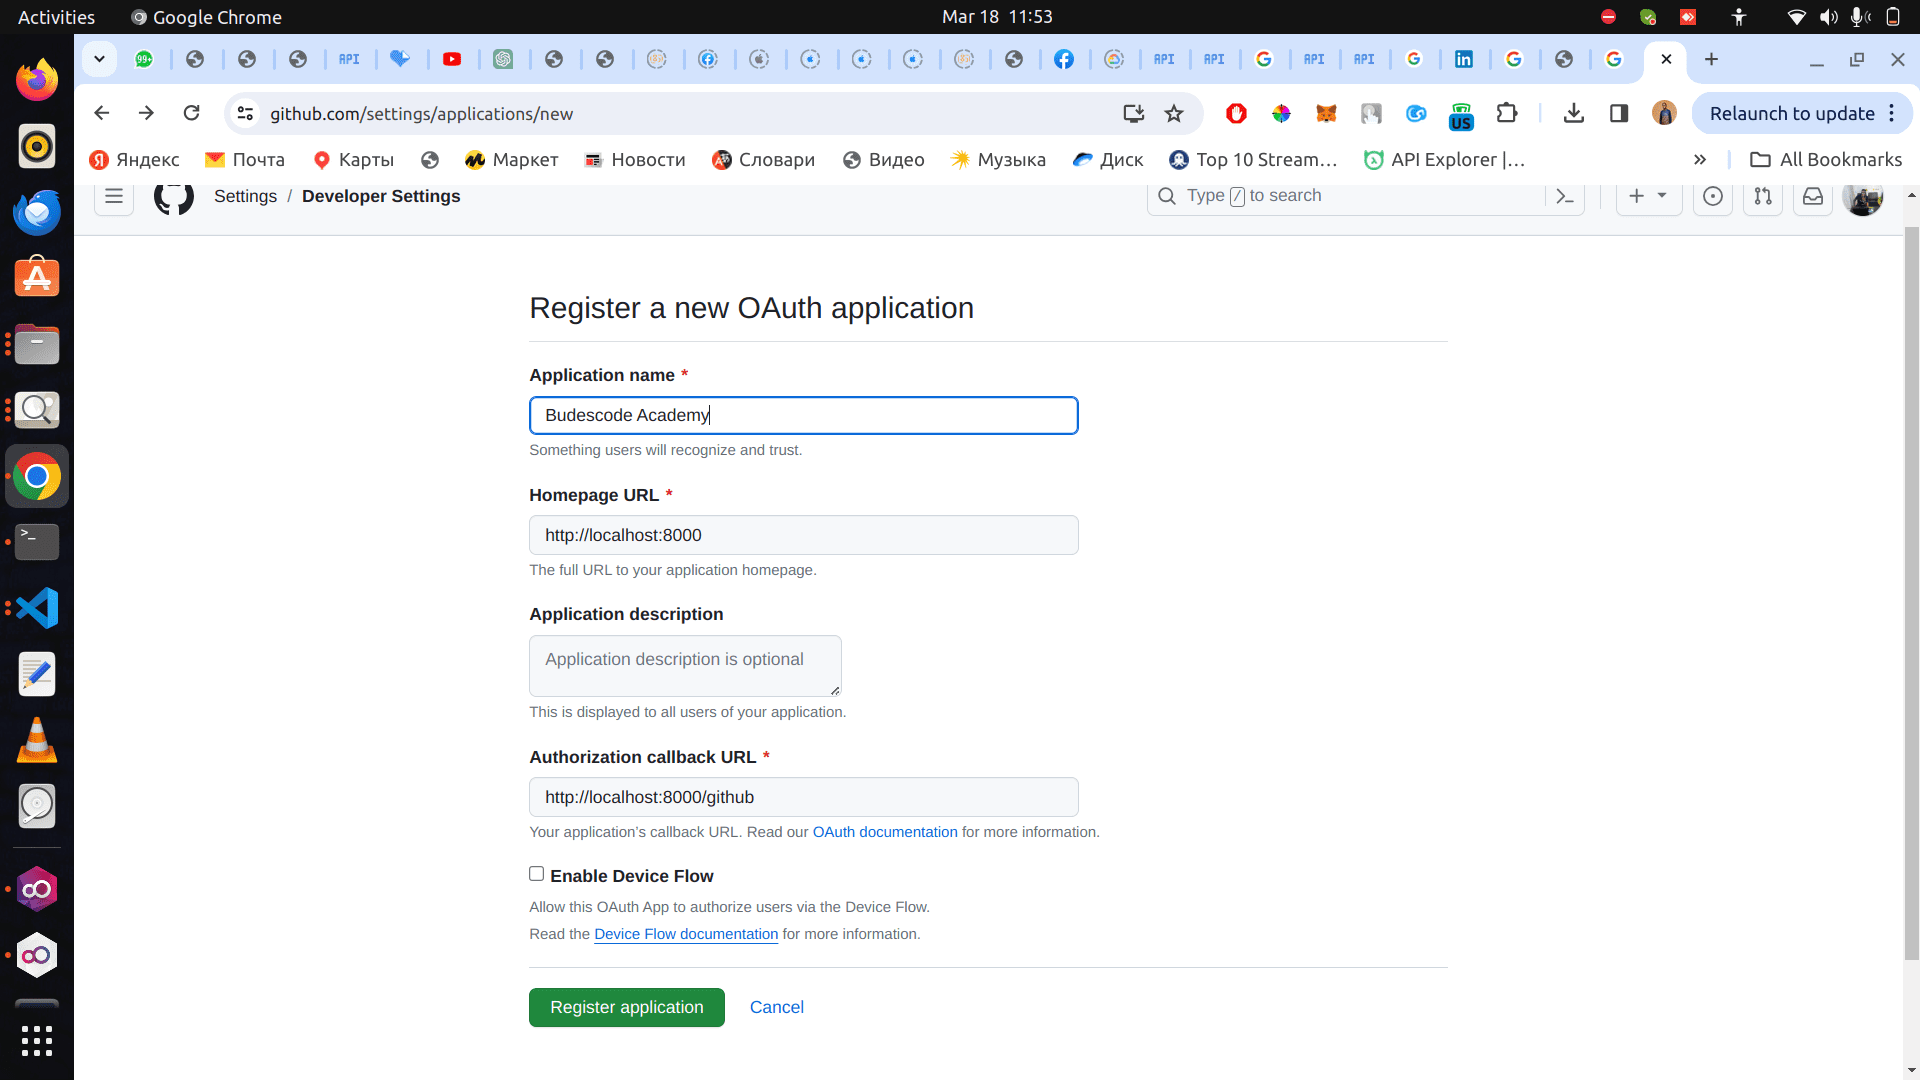
Generate a new client secret. Copy the client ID and Client Secret
Step2 Env Variables
Go to the .env file and paste the code below
GITHUB_CLIENT_ID=09b2cc10f4b9fc86726c
GITHUB_CLIENT_SECRET=97412f316358e8e56f715363f2e6f4fddb864114
GITHUB_REDIRECT_URL=http://localhost:8000/github
Step 3 Views.py
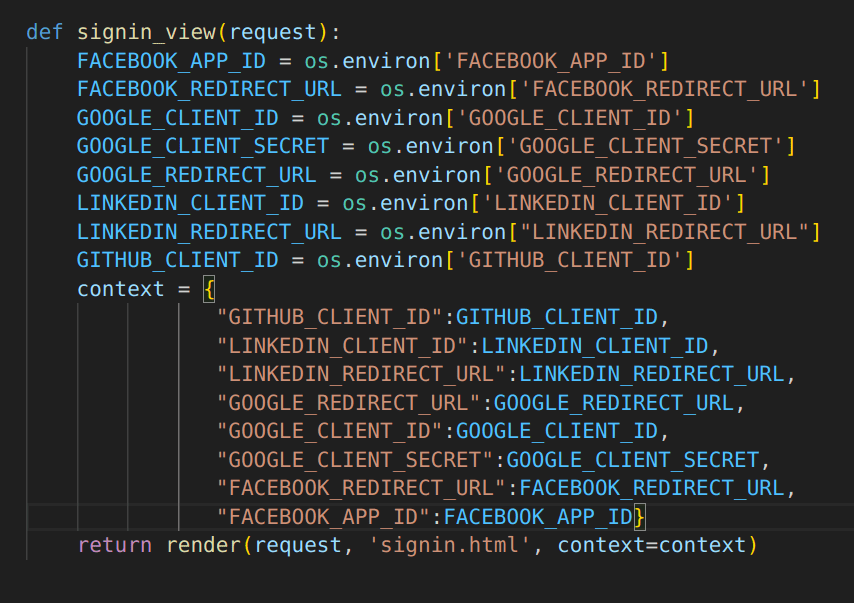
Go to the signin_view and add the code below
GITHUB_CLIENT_ID = os.environ['GITHUB_CLIENT_ID']
Add it to your context as well. Your views should be like the screenshot below
Step 4 Siginin.html
We would update our signin with github button in our signin.html. Add the code below to the href in the a tag
https://github.com/login/oauth/authorize?scope=user,user:email&client_id={{ GITHUB_CLIENT_ID }}
Step 5: configuring redirect url (views.py)
Paste the code below in your views.py
def github_signin(request):
GITHUB_CLIENT_ID = os.environ['GITHUB_CLIENT_ID']
GITHUB_CLIENT_SECRET = os.environ['GITHUB_CLIENT_SECRET']
code = request.GET.get("code")
url = 'https://github.com/login/oauth/access_token'
headers1 = {
'Accept': 'application/json'
}
body = {"client_id":GITHUB_CLIENT_ID, "client_secret":GITHUB_CLIENT_SECRET, "code":code, "accept":"json"}
resp = requests.post(url, json=body, headers=headers1)
status_code = resp.status_code
data = resp.json()
if status_code <400:
if 'error' in data.keys():
error = data['error_description']
return HttpResponse(error)
access_token = data['access_token']
headers1 = {
'Accept': 'application/json',
'Authorization': f'Bearer {access_token}',
}
url = 'https://api.github.com/user'
resp = requests.get(url,headers=headers1)
data = resp.json()
email = data['email']
name = data['name']
firstname, lastname = name.split(' ', 1)
avatar_url = data['avatar_url']
user, created = User.objects.get_or_create(email=email, username=email, defaults={'first_name': firstname, 'last_name': lastname})
login(request, user)
return redirect("/")
else:
error = data['error_description']
return HttpResponse(error)
Step 5: configuring redirect url (urls.py)
Paste the code below in your urls.py
path('github', views.github_signin, name="github_signin"),
Step 6: Test
Go to http://localhost:8000/ and click the Sign in with Github button
REFERENCES
https://developers.facebook.com/docs/facebook-login/guides/advanced/manual-flow/
Facebook Scopes: https://developers.facebook.com/docs/permissions/
https://learn.microsoft.com/en-us/linkedin/shared/authentication/authentication