Deploy Django with Postgres, Nginx, and Gunicorn on Ubuntu Server

Introduction
Deploying a Django web application involves more than just putting your code on a server. It requires a well-configured stack that includes a web server, application server, and a relational database.
In this guide, we will walk you through the process of deploying a Django application using Postgres as the database, Nginx as the web server, and Gunicorn as the application server on a server running Ubuntu.
Prerequisites
To successfully follow this guide, ensure that you have a VPS server with Ubuntu installed and with a basic firewall.
Our approach involves installing Django within a dedicated virtual environment. By doing so, each project can maintain its own environment, ensuring clean separation of dependencies and requirements.
After setting up the database and deploying your Django application, the next step involves installing and configuring the Gunicorn application server. Acting as an intermediary between client requests and Python calls, Gunicorn facilitates seamless communication with your application. Following this, we'll integrate Nginx with Gunicorn to harness its high-performance connection handling and straightforward security features.
This guide will walk you through these steps, providing a comprehensive approach to deploying and optimizing your Django application on Ubuntu.
LETS BEGIN!
Set Up a Firewall for Network Security
Establishing a firewall on your server enhances network security by defining rules for incoming and outgoing server requests. In this guide, we'll utilize Uncomplicated Firewall (UFW), which is pre-installed on Ubuntu, simplifying the setup process without requiring additional installations.
To activate UFW on your server, use the following command:
Note: Ensure that you have SSH access to your remote server.
ufw enable
Allow all outgoing ports by running the command below. You can allow all outgoing requests because it doesn’t pose a threat from external sources.
ufw default allow outgoing
Run the command below to prevent access to your server from the outside world.
ufw default deny incoming
When you ran the command above, you also blocked SSH requests. To continue using SSH to access our server, you must enable SSH. To do this, run the following command:
ufw allow ssh
Allow http/tcp traffic on the firewall so that your browser can access your app.
sudo ufw allow http/tcp
Installing Python
sudo add-apt-repository ppa:deadsnakes/ppa
sudo apt update
sudo apt install python3
Initial Server Setup
Run the following commands to update the package list, install necessary dependencies, and set up PostgreSQL:
sudo apt update
sudo apt install python3-pip python3-dev libpq-dev postgresql postgresql-contrib nginx curl
Setting Up Django in a Virtual Environment
- Navigate to your project's directory:
- Install the virtual environment package and Create a virtual environment using the following command
sudo apt install python3-venv
python3 -m venv myvenv
- Activate the virtual environment:
source myvenv/bin/activate
- Install Django and other dependencies:
pip install django gunicorn psycopg2-binary
psycopg2-binary is a PostgreSQL adapter for Python. It's a Python module that allows Python programs to interact with PostgreSQL databases.
Create a Database and User
Access an interactive PostgreSQL session by entering the following command:
sudo -u postgres psql
create a database for your project:
CREATE DATABASE mydjangodb;
Next, create a database user for our project. Make sure to select a secure password:
CREATE USER mydjangouser WITH PASSWORD 'PASSWORD123';
Now, we can give our new user access to administer our new database:
GRANT ALL PRIVILEGES ON DATABASE mydjangodb TO mydjangouser;
ALTER DATABASE mydjangodb OWNER TO mydjangouser;
GRANT USAGE, CREATE ON SCHEMA PUBLIC TO mydjangouser;
Exit the PostgreSQL prompt.
\q
Creating a new django project
django-admin startproject myproject
if you have an existing project on github already, you can clone it in this directory
Edit the settings.py
nano myproject/settings.py
We first of all change the ALLOWED_HOSTS in our settings file.
ALLOWED_HOSTS is a Django settings variable used for security. It defines a list of valid host/domain names that the Django application can serve. Properly configuring it helps prevent HTTP Host header attacks by ensuring that the Host header in incoming requests matches one of the allowed values. This setting is crucial for production environments to enhance the security of your Django application.
ALLOWED_HOSTS = ['yourdomain.com', 'youripaddress', 'sub.yourdomain.com', 'localhost']
#Replace 'yourdomain.com', 'sub.yourdomain.com', and 'localhost' with the actual domain names or IP addresses that your Django application is allowed to serve.
#You can use a wildcard ('*') to allow any subdomain.
Next step is to configure our data base
Find the DATABASES setting in the settings.py file and configure it according to your database setup. If you're using PostgreSQL, the configuration may look like this:
The details can be gotten from the database we created with postgres
DATABASES = {
'default': {
'ENGINE': 'django.db.backends.postgresql',
'NAME': 'mydjangodb',
'USER': 'mydjangouser',
'PASSWORD': 'PASSWORD123',
'HOST': 'localhost',
'PORT': '',
}
}
Next, we Configure static files in Django by specifying the static URL, defining directories where static files are located (STATICFILES_DIRS), and setting the absolute path for collecting static files (STATIC_ROOT).
STATIC_URL = '/static/'
STATIC_ROOT = os.path.join(BASE_DIR, 'static/')
SAVE THE FILE WITH CTRL + S and exit with CTRL + x
Apply Migrations
python3 manage.py makemigrations
python3 manage.py migrate
Create Superuser
This step is optional and allows you to create an administrative superuser account for the Django admin interface. You will have to select a username, provide an email address, and choose and confirm a password.
python manage.py createsuperuser
Collect static
We can collect all of the static content into the directory location we configured. You will have to confirm the operation. The static files will then be placed in a directory called static within your project directory.
python manage.py collectstatic
Allowing Incoming Traffic on Port 8000 with UFW
When deploying a web application or service that utilizes port 8000, it's essential to configure the firewall to permit incoming traffic on this specific port. In Ubuntu, the Uncomplicated Firewall (UFW) provides a straightforward way to manage firewall rules.
sudo ufw allow 8000
You can test your project by launching the Django development server using the following command:
python manage.py runserver 0.0.0.0:8000
This command initiates the development server and makes your project accessible.
In your web browser, go to the domain name or IP address of your server, and append ":8000" to the end of the address.
http://server_domain_or_IP:8000
Type CTRL + C to kill the server
Verifying Gunicorn's Capacity to Serve the Project
Before exiting the virtual environment, it's crucial to verify Gunicorn's capability to serve the project. Navigate to the project directory and employ Gunicorn to load the project's WSGI module, ensuring the proper functioning of the application.
gunicorn --bind 0.0.0.0:8000 myproject.wsgi
The command gunicorn --bind 0.0.0.0:8000 myproject.wsgi is used to start the Gunicorn web server and bind it to the specified IP address and port.
It starts Gunicorn and makes the Django application accessible on the specified IP address and port. Testing Gunicorn with this command ensures that it can successfully serve the Django project in a production environment
now we're done, we can deactivate our virtual environment by running the command
deactivate
Create Gunicorn systemd file
A systemd file is a system configuration file designed to automate the execution of your application. Instead of manually running the Gunicorn command each time or monitoring your app, the systemd file manages this process for you. It ensures that your application restarts automatically in various scenarios, such as server maintenance or power outages. This automation enhances the reliability and stability of your application, allowing systemd to handle the lifecycle of your app seamlessly.
Start by creating a systemd socket file for gunicorn.
sudo nano /etc/systemd/system/gunicorn.socket
The contents of the file should look like this:
[Unit]
Description=gunicorn socket

[Socket]
ListenStream=/run/gunicorn.sock

[Install]
WantedBy=sockets.target
Save with CTRL+S and exit with CTRL+X
Next we create a systemd service file for gunicorn with the following command:
sudo nano /etc/systemd/system/gunicorn.service
Paste the following code
[Unit]
Description=gunicorn daemon
After=network.target
[Service]
User=root
Group=www-data
WorkingDirectory=/home/yourusername/path-to-your-projectdir
ExecStart=/home/yourusername/path-to-your-projectdir/yourprojectenv/bin/gunicorn \
--access-logfile - \
--workers 3 \
--bind unix:/run/gunicorn.sock \
myproject.wsgi:application
[Install]
WantedBy=multi-user.target
NOTE
WorkingDirectory is the path to where your manage.py file is
ExecStart is the path to where your virtualenv/bin/gunicorn
User should be the user you're logged in as , in my case, I'm logged in as the root user
Replace the directory to your own directory and make sure the path is correct. When you have completed and checked your file, you can run the following commands to start your systemd file.
Now we can start and enable gunicorn
sudo systemctl start gunicorn.socket
sudo systemctl enable gunicorn.socket
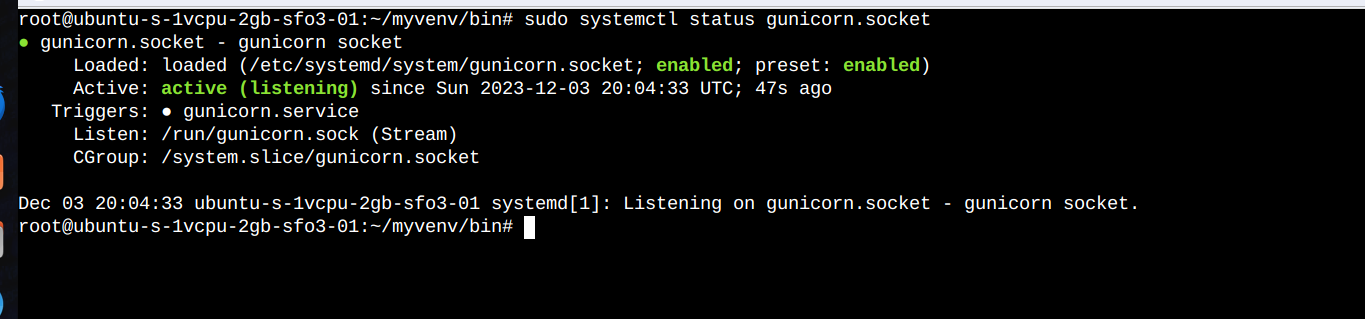
check for the status of your gunicorn
sudo systemctl status gunicorn.socket
You should have something like the screenshot below.
If there is an error reported by the systemctl status command or if the gunicorn.sock file is not present in the directory, it suggests an issue with the successful creation of the Gunicorn socket. To investigate further, review the logs for the Gunicorn socket by entering:
sudo journalctl -u gunicorn.socket
Check the systemd status
This verifies that gunicorn is working
sudo systemctl status gunicorn
If the output from curl or the output of systemctl status indicates that a problem occurred, check the logs for additional details:
sudo journalctl -u gunicorn
To validate the socket activation mechanism, you can send a connection to the socket using curl with the following command:
curl --unix-socket /run/gunicorn.sock localhost
If successful, you will receive the HTML output from your application in the terminal. This confirms that Gunicorn was initiated and could serve your Django application.
Troubleshooting Gunicorn
Check your /etc/systemd/system/gunicorn.service file for problems.
If you make changes to the /etc/systemd/system/gunicorn.service file, reload the daemon to reread the service definition and restart the Gunicorn process by typing:
sudo systemctl daemon-reload
sudo systemctl restart gunicorn
Configure Nginx to server your Django Application
Start by creating and opening a new server block in Nginx’s sites-available directory:
sudo nano /etc/nginx/sites-available/myproject
paste the following code
server {
listen 80;
listen [::]:80;
server_name yourdomain.com www.yourdomain.com youripaddress;
location = /favicon.ico { access_log off; log_not_found off; }
location /static/ {
root /home/yourusername/path-to-yourstatic-folder;
}
location / {
include proxy_params;
    proxy_pass http://unix:/run/gunicorn.sock;
}
}
Close the file. Enable the file using the command:
sudo ln -s /etc/nginx/sites-available/myproject /etc/nginx/sites-enabled
Test your Nginx configuration for syntax errors by typing:
sudo nginx -t

If no errors are reported, go ahead and restart Nginx by typing:
sudo systemctl restart nginx
It is necessary to allow regular traffic on port 80 by adjusting our firewall settings. As we no longer require access to the development server, we can eliminate the rule that opened port 8000 as well.
sudo ufw delete allow 8000
sudo ufw allow 'Nginx Full'
Now everything is done. Go ahead and paste your server ip or domain name in your browser, it should work!!
Troubleshooting Nginx
- If Nginx Is Showing the Default Page Instead of the Django Application
If Nginx is displaying the default page instead of forwarding requests to your application, it's likely that you need to modify the
server_namedirective in the/etc/nginx/sites-available/myprojectfile to match your server's IP address or domain name.Nginx relies on the
server_nameto identify the appropriate server block for handling incoming requests. If you encounter the default Nginx page, it indicates that Nginx was unable to match the request to a specific server block, so it's falling back on the default block configured in/etc/nginx/sites-available/default.To ensure that Nginx selects the server block associated with your project, the
server_namespecified in your project's server block should be more specific than the one defined in the default server block. -
Nginx Is Displaying a 502 Bad Gateway:
This error typically indicates that Nginx is unable to communicate with the upstream server, such as Gunicorn or another application server. Several reasons can lead to this error:Application Server Not Running: Ensure that your application server (e.g., Gunicorn) is running and configured correctly. Check its logs for any issues.
Incorrect Upstream Configuration: Verify the proxy_pass configuration in your Nginx configuration file. It should correctly point to the upstream server.
location / {
proxy_pass http://unix:/run/gunicorn.sock;}
Firewall Issues: Check if your firewall is blocking communication between Nginx and the upstream server. Ensure that the necessary ports are open.
Insufficient Resources: If your server is running out of resources (CPU, memory), it may lead to the "502 Bad Gateway" error. Check system resource usage.
The main source of additional information is found in Nginx's error logs. Typically, these logs provide details about the conditions that led to issues during the proxying process. To access the Nginx error logs, use the following command:
sudo tail -F /var/log/nginx/error.log
NOTE
If you make any changes to your code, always restart the gunicorn with the following command for it to reflect.
service gunicorn restart
Conclusion
Successfully deploying a Django application with Postgres, Nginx, and Gunicorn on Ubuntu requires careful configuration and attention to detail. By following the steps outlined in this guide, you can effectively set up a robust and scalable production environment for your Django project. Remember to thoroughly test your application and ensure it functions as expected before deploying it to a live production environment.